
MSI Afterburner is the gold standard on Windows. But on Linux, we need a different approach.
This guide is part of the MusaBase Linux Gaming series. For the complete overview, see the Linux Gaming Roadmap: Complete Guide Series.
Welcome back to MusaBase. If you have an AMD Radeon GPU and want to overclock, undervolt, or set custom fan curves on Linux, you have probably searched for an MSI Afterburner alternative. Good news. It exists. But not as a single tool.
The first time I tried to overclock my AMD GPU on Linux, I felt lost. I opened the terminal, found nothing obvious. Then I discovered CoreCtrl. A few clicks later, I was adjusting fan curves and pushing memory clocks. But CoreCtrl alone is not a complete MSI Afterburner replacement. It works only with AMD GPUs and handles hardware tuning, not in game monitoring. For that, I found MangoHud. It gives us exactly what Afterburner's on screen display does: FPS, temperatures, clock speeds, and usage while we play.
In this guide, we will learn:
- Installing and configuring CoreCtrl for AMD GPU overclocking, undervolting, and fan curves
- Setting up MangoHud for real time in game monitoring
- Creating performance profiles that auto switch per application
This guide is for AMD GPU users who want full control on Linux. Just CoreCtrl for tuning and MangoHud for monitoring.
⚡ TL;DR: MSI Afterburner Alternative on Linux for AMD GPUs
Quick reference to install and configure CoreCtrl for GPU tuning and MangoHud for in‑game monitoring on Arch Linux. Copy‑paste the commands below to get full AMD GPU control without a password prompt.
-
Install CoreCtrl (AUR):
yay -S corectrl -
Install MangoHud:
sudo pacman -S mangohud -
Enable full GPU control (overclock, undervolt):
sudo nano /etc/default/grub # Append amdgpu.ppfeaturemask=0xffffffff inside GRUB_CMDLINE_LINUX_DEFAULT # Example: GRUB_CMDLINE_LINUX_DEFAULT="quiet splash amdgpu.ppfeaturemask=0xffffffff" sudo grub-mkconfig -o /boot/grub/grub.cfg reboot -
Autostart CoreCtrl without password (Polkit > 106):
Add this content inside the file:mkdir -p ~/.config/autostart cp /usr/share/applications/org.corectrl.CoreCtrl.desktop ~/.config/autostart/ sudo nano /etc/polkit-1/rules.d/90-corectrl.rulespolkit.addRule(function(action, subject) { if ((action.id == "org.corectrl.helper.init" || action.id == "org.corectrl.helperkiller.init") && subject.local == true && subject.active == true && subject.isInGroup("wheel")) { return polkit.Result.YES; } }); -
MangoHud on Steam:
# Right‑click game → Properties → Launch Options: mangohud %command% -
MangoHud on Bottles:
# Settings → Performance → Enable "Monitor Performance" -
MangoHud with Wine / standalone:
mangohud wine game.exe # or mangohud ./your-game
💡 After reboot, open CoreCtrl, create a profile, set custom fan curves, and choose Advanced performance mode to access overclocking. In‑game, press Shift+F10 to toggle MangoHud detail levels. If your Polkit version is < 106, use a .pkla file instead (see full guide).
What is CoreCtrl and MangoHud?
All credit for CoreCtrl goes to Juan Palacios, the main developer and lead behind this amazing software, for giving us a true MSI Afterburner alternative for AMD GPUs on Linux.
CoreCtrl is a graphical tool for tuning AMD GPU on Linux. We can overclock, undervolt, set custom fan curves, adjust power limits, and create application specific profiles. It taps directly into the amdgpu driver and gives us full hardware control. But it does not provide an in game overlay.
MangoHud fills that gap. It is a real time performance overlay for Vulkan and OpenGL games. It shows FPS, GPU temperature, clock speeds, usage, CPU stats, and more. Fully customizable and very lightweight. Steam Deck uses it too.
All credit for MangoHud goes to the Flightlessmango repository on GitHub, as well as the community and all its contributors for building and maintaining this excellent tool for in-game performance monitoring on Linux.
Together, CoreCtrl (hardware tuning) + MangoHud (in game monitoring) replace everything MSI Afterburner does on Windows. CoreCtrl handles the knobs. MangoHud shows the results while we play.
Step 1: Install CoreCtrl and MangoHud
Installing CoreCtrl is really straightforward on Arch Linux. However, we need yay because it is available on the AUR.
1.1: Install CoreCtrl
- Open terminal and run:
yay -S corectrl - After running the corectrl install command, follow the standard yay prompts and press Enter when prompted for packages to cleanbuild? and Diffs to show?, then confirm dependencies and package installation and it will be installed.


1.2: Install MangoHud
- To install MangoHud, open terminal and run:
sudo pacman -S mangohud


Step 2: Launch CoreCtrl and Fan Curves Settings
In this step, we will launch CoreCtrl and learn how its interface works, how to create and set custom profiles and configure its settings for an AMD GPU. For basic settings, I will only set the custom fan curves for my GPU which is an AMD RX 580 8GB. I usually don't overclock my hardware. I only set the fan curves based on my needs.
2.1: Launch CoreCtrl
- To launch CoreCtrl, simply go to your application menu or manager and type in the search corectrl.


2.2: Understanding CoreCtrl Interface
- On the main screen, we have four tabs or buttons.
- At the top left corner, we have a default Global Profile.
- At the top right corner, we have a + button to add new profiles.
- At the bottom left, we have the Profiles tab (default).
- At the bottom right, we have the SYSTEM tab, which contains only static information about:
- CoreCtrl itself (its version and link to its official repository and other pages).
- Software: Contains information about Kernel version and Graphics Driver version.
- GPU: Contains information about BIOS version, Device ID, Driver, Vulkan API version, etc.
- Processor: Contains information about Architecture, CPU Family, Cores, Model, etc.


2.3: Create CoreCtrl Profile
- To create a custom profile in CoreCtrl, click on the + at the top right corner.
- A dialog box will appear asking for:
- Profile Name: Enter the name you want for your profile (e.g., Gaming).
- Activation which can be set to Automatic or Manual:
- With Automatic activation, we have to provide an executable. For example, I am giving it the executable for Bottles. So when I run bottles to play games, this profile will be activated automatically and control voltage and fan speed as I have defined in this profile.
- With Manual activation, we would need to manually open CoreCtrl and activate our profile each time.
- We can also set a custom icon for our profile. For simplicity, I leave the icon as default.
- After setting the name and activation type, click on OK to create the profile.


2.4: Set Custom Fan Curves in CoreCtrl
- Open the Profile we just created.
- Select the GPU tab from the top left corner.
- Next, from the dropdown next to Ventilation, select Curve.
- In the Curve graph, the X-axis (horizontal) represents the GPU temperature and the Y-axis (vertical) represents the fan speed.
- Adjust the dots on the graph according to your needs, then click Apply and finally click Save at the top right corner.


2.5: Enable Full GPU Control
If you look for overclocking or voltage control for your AMD GPU inside CoreCtrl under Performance mode by choosing Advanced from the dropdown, you will most likely see only two options:
- Power limit (W) with a slider and input box.
- Power profile with dropdown options (3D Fullscreen preselected).


There are no advanced options for voltage or memory tuning yet. This is because, by default, the amdgpu driver locks advanced features on Linux mostly for system stability. However, we can tell our kernel to give full access to our AMD GPU to CoreCtrl by configuring our GRUB. To give full GPU hardware control to CoreCtrl, do the following:
- Open terminal and run:
sudo nano /etc/default/grub - In the grub file, look for the line:
GRUB_CMDLINE_LINUX_DEFAULT - It is usually the 4th line. If you haven't touched the grub file before, this line will have only system defined parameters. We need to append this parameter to that line:
amdgpu.ppfeaturemask=0xffffffff

- After appending the parameter, press Ctrl + O to save the file, then press Enter to confirm, then press Ctrl + X to exit the file.
- Next we need to update the grub configuration and reboot the PC so the changes can take effect.
- Update the grub file with:
sudo grub-mkconfig -o /boot/grub/grub.cfg - After grub finishes updating, reboot your PC.
- After reboot, you will see more advanced options are visible and enabled in CoreCtrl under GPU Performance mode's advanced dropdown.


Step 3: Configure CoreCtrl for Autostart
Now, after following Section 2.5: Enabling Full AMD GPU Control and rebooting your PC with the amdgpu kernel parameter applied, you may have noticed something. CoreCtrl does not start automatically on boot. In this step, we will add this functionality to autostart CoreCtrl with every boot. However, simply adding a boot entry will still prompt for your user password each time you log into your Linux system. In this section, we will fix that issue as well.
3.1: Add CoreCtrl Autostart Entry
To autostart CoreCtrl with every desktop boot, we only need to add its entry to ~/.config/autostart/. Do the following:
- Open terminal and run:
cp /usr/share/applications/org.corectrl.CoreCtrl.desktop ~/.config/autostart/org.corectrl.CoreCtrl.desktop - First, create the ~/.config/autostart directory by running the following command in your terminal:
mkdir -p ~/.config/autostart - Next, run the cp /usr/share/ command again:
cp /usr/share/applications/org.corectrl.CoreCtrl.desktop ~/.config/autostart/org.corectrl.CoreCtrl.desktop

However, this setup still requires entering the user's password at every boot. To autostart without needing to enter the password each time, we need to add rules for Polkit (PolicyKit).
3.2: Skip User Password for CoreCtrl at Every Boot
Because CoreCtrl needs root privileges to control GPU hardware, the system will still ask for your password each time it starts. To skip entering the password every time, we need to create a corectrl.rules file and add a few lines of code so it automatically starts without requiring the password.
3.2.1: Verify Polkit Version
- First, verify your polkit version by running:
pkaction --version
- If your polkit version is less than 106, then follow Polkit Version Less Than 106. If your polkit version is greater than 106, like mine is 127, then follow Polkit Version Greater Than 106 .

3.2.2: For Polkit Version Less Than 106
sudo nano /etc/polkit-1/localauthority/50-local.d/90-corectrl.pkla- Next, in the opened file add the following code:
[User permissions] Identity=unix-group:your-user-group Action=org.corectrl.* ResultActive=yes - After adding the code, press Ctrl + O to save the file, then press Enter to confirm, then press Ctrl + X to exit the file.
3.2.3: For Polkit Version Greater Than 106
- Open terminal and run:
sudo nano /etc/polkit-1/rules.d/90-corectrl.rules - Next, in the opened file add the following code:
polkit.addRule(function(action, subject) { if ((action.id == "org.corectrl.helper.init" || action.id == "org.corectrl.helperkiller.init") && subject.local == true && subject.active == true && subject.isInGroup("wheel")) { return polkit.Result.YES; } }); - After adding the code, press Ctrl + O to save the file, then press Enter to confirm, then press Ctrl + X to exit the file.


Now, when you log into your Linux desktop, CoreCtrl will launch automatically without asking for your password.
Step 4: Test Setup
Now that everything is set up and configured, let us test the setup. CoreCtrl will always be running in the background and will tune the GPU as we have set in our profile. However, to run MangoHud, we need to explicitly tell it to show the overlay while playing a game. The method of running MangoHud is the same across any game manager on Linux, whether we play from Steam, Bottles, or Wine.
4.1: MangoHud for Steam
- On Steam, we need to add the mangohud argument to the game in which we want to see real-time hardware stats while playing.
- To enable MangoHud on Steam, simply right-click the game from your Library and choose Properties.
- Next, in the General tab, type the following in the LAUNCH OPTIONS input field:
mangohud %command%

4.2: MangoHud for Bottles
- For Bottles, adding MangoHud is really easy. Just open Bottles and click on Settings.
- Next, scroll down to the Performance section and enable Monitor Performance. That is it.


4.3: MangoHud for Wine
- For Wine, if you are using Wine from the terminal like me, you would have to write mangohud before wine "playgame.exe" for any game you want to monitor.
- It looks something like this:
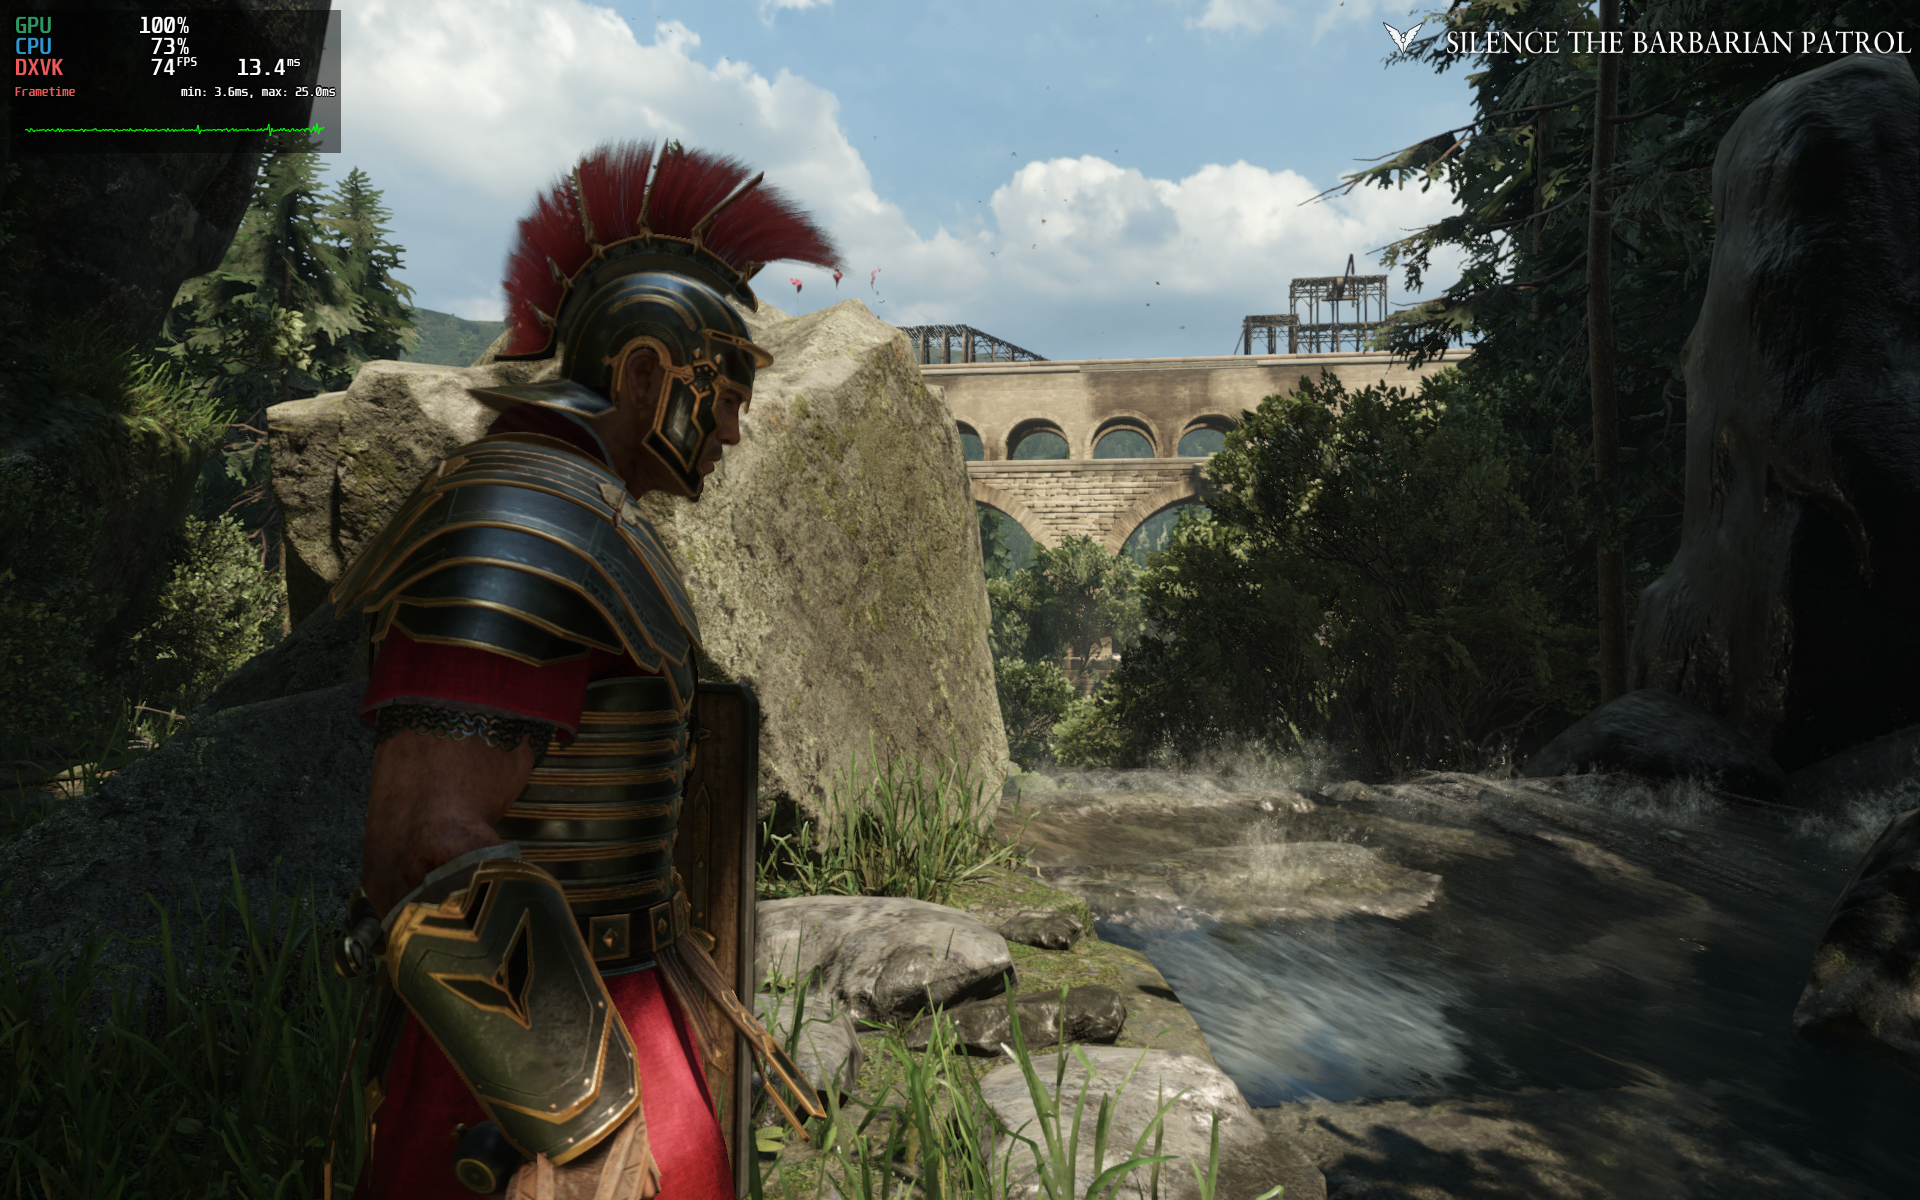
mangohud WINEPREFIX=~/wine/my-games wine "/mnt/sdc1/fin/Ryse - Son of Rome/Bin64/Ryse.exe"

Ryse: Son of Rome
Now, if we run any game with vanilla MangoHud, you may notice it only shows some basic stats, like:
- CPU Usage
- GPU Usage
- Graphics API and Real-Time FPS
- FPS Time Graph
- To view more detailed stats, we just need to toggle MangoHud options with Shift + F10 while in-game. We do not need to close the game.
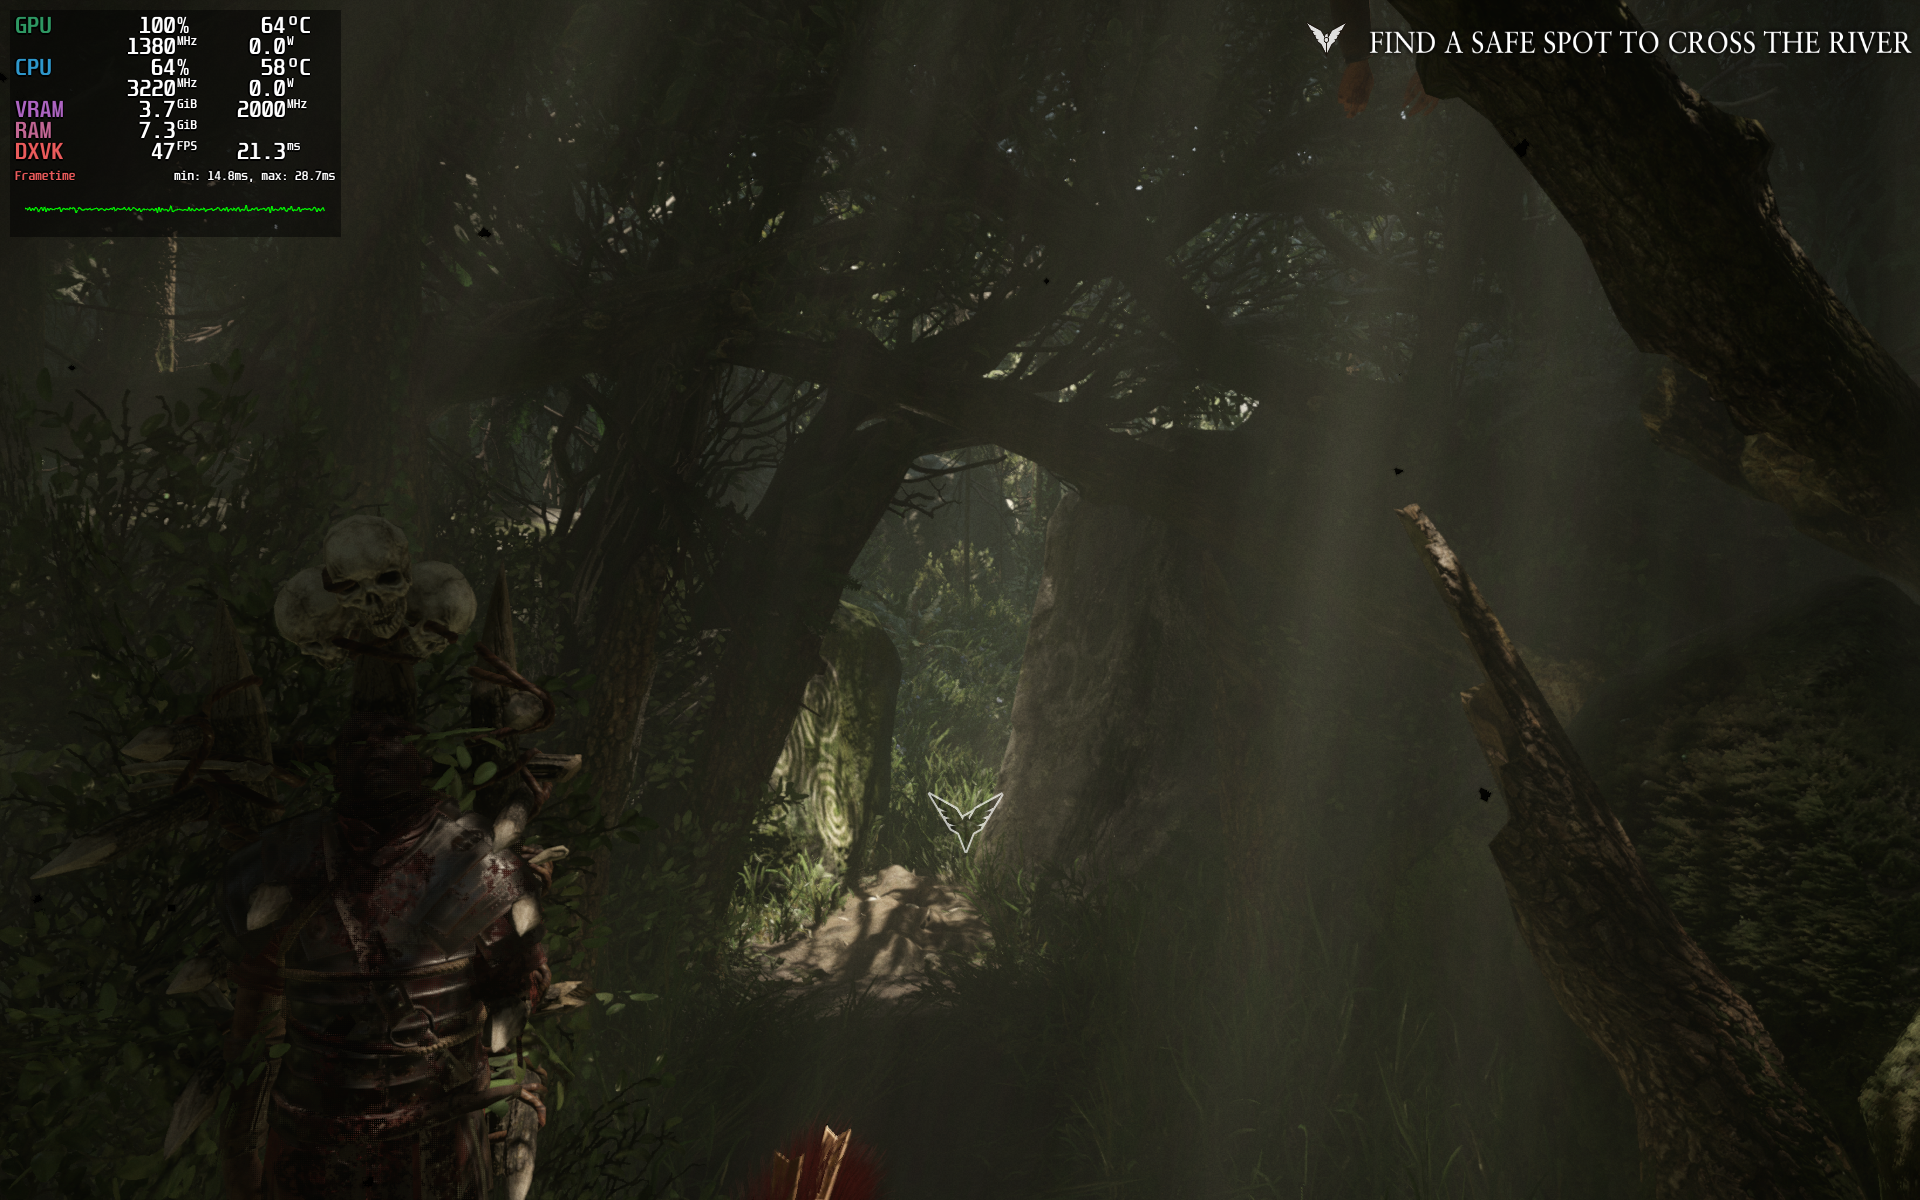
Here you can see more detailed stats. Just toggle between different styles of stats with Shift + F10 until you find the one that best suits you.
❓ Frequently Asked Questions: CoreCtrl & MangoHud on Linux
What is CoreCtrl and why do I need it for my AMD GPU on Linux?
CoreCtrl is a graphical tool that gives you full control over your AMD Radeon GPU on Linux. It allows you to set custom fan curves, overclock, undervolt, adjust power limits, and create application‑specific profiles. Without CoreCtrl (or a similar tool), you cannot easily tune your GPU’s hardware settings because the open‑source amdgpu driver hides advanced features by default.
Does CoreCtrl work with NVIDIA GPUs?
No. CoreCtrl is designed specifically for AMD GPUs that use the amdgpu driver. For NVIDIA cards, use GreenWithEnvy (GWE) or nvtop for monitoring and overclocking.
What is MangoHud and how is it different from CoreCtrl?
MangoHud is a real‑time in‑game overlay that shows performance metrics like FPS, GPU/CPU usage, temperatures, clock speeds, and frametimes. CoreCtrl handles hardware tuning (fan curves, overclocking), while MangoHud handles monitoring. Together they replace MSI Afterburner + RTSS on Windows.
Why do I need to install CoreCtrl from the AUR on Arch Linux?
CoreCtrl is not available in the official Arch Linux repositories. It is only in the AUR (Arch User Repository). You need an AUR helper like yay or paru to install it. On other distributions (Ubuntu, Fedora, etc.), CoreCtrl is available in the official repositories or via Flatpak.
Do I need to enable multilib for CoreCtrl or MangoHud?
No. Both tools are 64‑bit native applications and do not require 32‑bit libraries. However, if you plan to run Steam or Wine games alongside them, you may still need multilib for those game managers.
Why can’t I see overclocking or voltage controls in CoreCtrl after installation?
By default, the amdgpu driver hides advanced features for system stability. You must add the kernel boot parameter amdgpu.ppfeaturemask=0xffffffff to your bootloader (GRUB or systemd‑boot) and reboot. After that, select Advanced in CoreCtrl’s Performance mode to see all options.
Is adding amdgpu.ppfeaturemask=0xffffffff safe? Can it damage my GPU?
It is generally safe for desktop AMD GPUs (RX 400 series and newer). The parameter unlocks features that the hardware already supports. However, on some older or laptop GPUs it may cause instability (crashes, blank screens). If you experience issues, simply remove the parameter from your bootloader configuration and reboot. It will not permanently damage your hardware.
Why does CoreCtrl still ask for my password after I added it to autostart?
CoreCtrl needs root‑level access to control GPU hardware. Simply copying the .desktop file to ~/.config/autostart/ is not enough. You must also create a Polkit rule (either a .pkla or a .rules file) that grants CoreCtrl permission to run without a password. The exact method depends on your Polkit version.
How do I check my Polkit version on Linux?
Run pkaction --version in a terminal. If the version is 106 or higher, you need to create a .rules file in /etc/polkit-1/rules.d/. If it is lower than 106, create a .pkla file in /etc/polkit-1/localauthority/50-local.d/.
How do I enable MangoHud for non‑Steam games or standalone executables?
You have several options:
- Terminal: Prefix your game command with
mangohud, e.g.,mangohud ./game. - Lutris: Right‑click the game → Configure → System Options → toggle “Enable MangoHud”.
- Bottles: Go to Settings → Performance → enable “Monitor Performance”.
- Heroic Games Launcher: In game settings, add
mangohud %command%as a launch argument.
Can I customize what MangoHud shows and how it looks?
Yes. Create a configuration file at ~/.config/MangoHud/MangoHud.conf. You can change the overlay position, toggle individual metrics (FPS, GPU temp, CPU usage, etc.), set colors, font size, and even enable a frametime graph. The MangoHud GitHub repository contains a full list of options.
What does the shortcut Shift+F10 do in MangoHud?
Shift + F10 cycles through different preset layouts of the overlay. You can use it while a game is running to switch between minimal stats (just FPS) and detailed stats (GPU/CPU usage, temperatures, etc.) without restarting the game.
CoreCtrl shows only “Power limit” and no other controls – what’s wrong?
You have not enabled the full kernel parameter. Re‑check /etc/default/grub (or your bootloader config) for amdgpu.ppfeaturemask=0xffffffff. Then run sudo grub-mkconfig -o /boot/grub/grub.cfg and reboot. After reboot, open CoreCtrl and select Advanced in the Performance mode dropdown.
MangoHud overlay does not appear in my game. How do I fix it?
Possible causes and solutions:
- You forgot to add
mangohud %command%to Steam launch options or the equivalent for other launchers. - The game uses an unsupported graphics API (very old OpenGL games may not work). Most Vulkan and modern OpenGL titles are supported.
- You are running the game through a flatpak/snap that isolates the environment. Install MangoHud inside that sandbox or use the flatpak version of MangoHud.
- Try launching the game from a terminal with
mangohudprefix to see if any error messages appear.
Explore More
With CoreCtrl handling your GPU tuning and MangoHud delivering real‑time performance stats, your Linux gaming and workstation setup is now on par with — or even ahead of — what Windows offers. No more missing MSI Afterburner. You have full control over your AMD Radeon card, custom fan curves, voltage tweaks, and an in‑game overlay that shows exactly what your hardware is doing.
That wraps up this guide on replacing MSI Afterburner with CoreCtrl and MangoHud for your AMD GPU on Linux. Your system is now fully equipped for overclocking, undervolting, fan control, and real‑time performance monitoring. If you run into any issues — like kernel parameters not working or MangoHud not showing up — drop a comment below and we will figure it out together.
101 out, see you in the next guide.