
This guide is part of the MusaBase Virtualization series. For the complete overview, see the Linux Virtualization with QEMU/KVM guide.
Virtualizing Chrome OS Flex on Linux is a great way to experience Google's cloud-first OS without touching your hardware.
Hi all, welcome to my blog, MusaBase! In this comprehensive walkthrough, I'll guide you through the virtualization of Chrome OS Flex using QEMU (Quick Emulator) on Linux. I am using Arch Linux (btw), but you can achieve these same results on almost any Linux distribution. In this guide you'll learn:
- Configuring a QEMU Virtual Machine for Chrome OS Compatibility
- Creating and Attaching Virtual Storage Disks
- Booting the Chrome OS Flex Installer in a Virtual Environment
- Installation of Chrome OS Flex on a VM
- Booting Installed Chrome OS Flex inside VM
Setting this up might seem challenging, but I assure you that if you follow each step in this walkthrough, you'll have a fully functional virtual machine with Chrome OS Flex installed and running by the end. Let’s dive in!

Pretty Cool, right? Let's do this.
⚡ TL;DR: Install Chrome OS Flex on a QEMU Virtual Machine
A quick reference for the essential commands to download, configure, and install Chrome OS Flex on a QEMU/KVM virtual machine on your Linux system.
-
Install QEMU and core packages:
sudo pacman -S qemu-desktop qemu-img # Arch Linux sudo apt install qemu-system-x86 qemu-utils # Debian/Ubuntu sudo dnf install qemu-system-x86 qemu-img # Fedora -
Download and extract the Chrome OS Flex image:
wget https://dl.google.com/chromeos-flex/images/latest.bin.zip unzip latest.bin.zip mv *.bin chromeosflex.bin -
Create a virtual storage drive:
qemu-img create -f qcow2 chromeosflex.qcow2 16G -
Boot the installer and install Chrome OS Flex:
qemu-system-x86_64 -drive format=raw,file=chromeosflex.bin \ -drive format=qcow2,file=chromeosflex.qcow2 -m 8G -smp 2 -enable-kvm \ -display "gtk,gl=on,show-cursor=on" -device virtio-vga-gl -usb \ -device usb-tablet -
Boot into your newly installed Chrome OS Flex VM:
qemu-system-x86_64 -drive format=qcow2,file=chromeosflex.qcow2 \ -m 8G -smp 2 -enable-kvm -display "gtk,gl=on,show-cursor=on" \ -device virtio-vga-gl -usb -device usb-tablet -
Create a backup of your working VM (optional):
cp chromeosflex.qcow2 chromeosflex-backup.qcow2
💡 After installation, remember to remove the -drive format=raw,file=chromeosflex.bin flag from your QEMU command to boot directly from the virtual drive. Your session state will be saved automatically between reboots. For detailed troubleshooting, refer to the FAQ section above.
Limitations and Caveats
Chrome OS Flex is designed to be installed directly onto physical hardware, specifically, PCs and Macs, to revitalize older devices. Although it can be run in virtual machines, this is not its intended use case, and Google does not officially provide full support for it in a virtual environment. Furthermore, there are additional limitations with this setup: for example, you cannot run a Linux development environment within it because doing so requires nested virtualization, and successful operation is not guaranteed.
Prerequisites for Running Chrome OS Flex on a Virtual Machine
Running Chrome OS Flex on a virtual machine is straightforward, though the process differs from installing it on physical hardware. Instead of booting from a USB drive, you'll need to create a virtual drive (for installing Chrome OS Flex) and configure your VM to boot from the Chrome OS Flex recovery image. This approach allows you to test and get familiar with Chrome OS Flex in a safe virtual environment before considering any physical deployment.
Before proceeding, ensure your PC meets the following hardware requirements:
- Processor: Intel or AMD x86-64-bit compatible.
- RAM: 8GB or 16GB.
- Hard Drive: Allocate at least 16GB for Chrome OS Flex, plus additional space based on your needs.
- Operating System: Any Linux distribution to run QEMU.
- Virtual Machine Tool: QEMU.
Proxmox users: I haven't tried Chrome OS Flex inside Proxmox myself, but in theory the steps should work the same because Proxmox VE uses KVM underneath. After you create the chromeosflex.qcow2 drive, import it as a disk in a Proxmox VM and boot from it. The hardware requirements stay the same.
Step 1: Installing QEMU and Core Virtualization Packages
For detailed, distribution-specific instructions on installing QEMU and its virtualization dependencies, please see my QEMU installation guide. Once QEMU is set up, return here to continue configuring and running Chrome OS Flex in your virtual machine environment.
Step 2: Acquire Chrome OS Flex Image
Now that you've set up your virtual emulator, it's time to download the Chrome OS Flex image for QEMU. Note that Chrome OS Flex is not distributed as a conventional .ISO file. Instead, Google provides a recovery image in .bin format, compressed within a .zip file.
To download ChromeOS Flex:
- Option 1:
- Visit Google's Official Chrome OS Flex Page. Fill out the form and follow Google's guide to obtain the image.
- Option 2 (Recommended):
- Copy & Paste the link below into your browser for a direct download, bypassing Google's registration form.
https://dl.google.com/chromeos-flex/images/latest.bin.zip
- Copy & Paste the link below into your browser for a direct download, bypassing Google's registration form.
- Once the download is complete, you will have a .zip file, usually named similarly to:
chromeos_16002.51.0_reven_recovery_stable-channel_mp-v6.bin.zip - Extract this file to get the .bin installer image needed for VM.


Extract Chrome OS Flex ISO:
Since QEMU needs the raw image, you must extract the .bin file from the .zip archive. You can use a graphical tool like Ark or any utility that supports ZIP extraction.
- Installation (For Arch-based distributions):
sudo pacman -S ark
After extracting, you'll see a large .bin file. For easier management in your QEMU commands, I recommend renaming this file to something simple, like chromeosflex.bin.
Step 3: Installing Chrome OS Flex On a Virtual Machine
Now that your QEMU virtual emulator is set up, configured, and you've downloaded and extracted the Chrome OS Flex image, it's time to install Chrome OS Flex on your virtual machine. First, create a virtual storage device where the OS will be installed.
3.1: Creating a Virtual Storage Drive
- Open your terminal.
- (Optional) If you want the virtual drive created in a specific directory, navigate there using the cd command. By default, the drive will be created in your home directory.
- I'm going to create my virtual drive in .qcow2 format.
- To create the virtual drive, type:
qemu-img create -f qcow2 chromeosflex.qcow2 16G


- Note: Make sure that your chromeosflex.bin file and chromeos.qcow2 (virtual drive) are in the same directory. Like this:


3.2: Booting into Chrome OS Flex Image
Next, attach your drives to the VM.
- The first drive to be attached will be the chromeosflex.bin file (the installer, which functions like a bootable USB).
- The second drive is the virtual storage drive (chromeosflex.qcow2) where the OS will be installed.
- Note: Confirm you're in the same directory as both files; use cd if necessary.
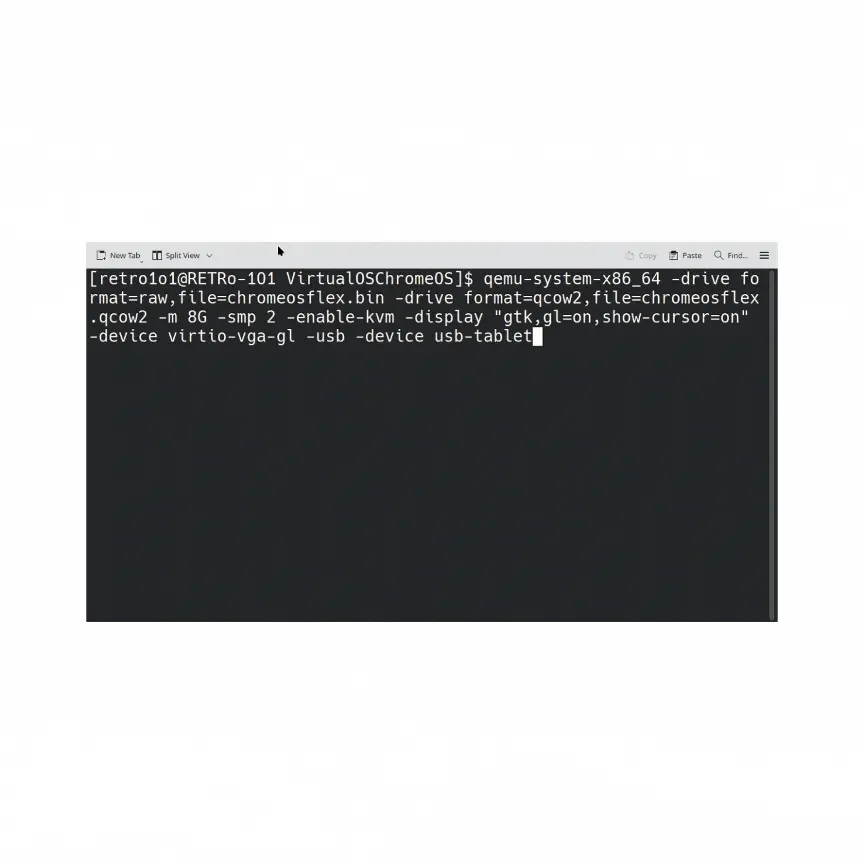
- To launch QEMU with chromeosflex.bin and chromeosflex.qcow2, type:
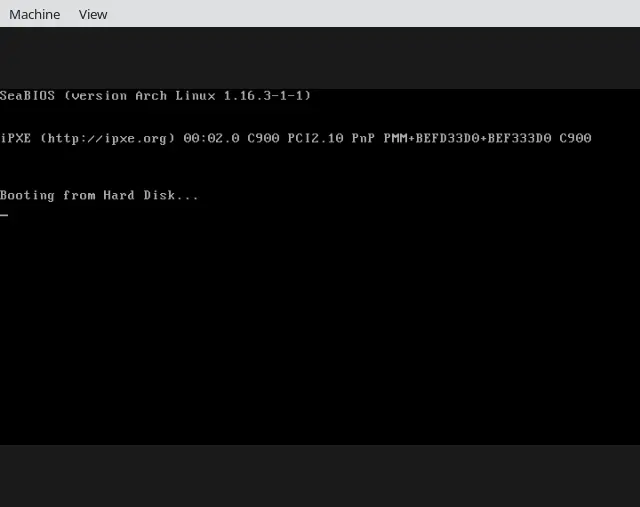
qemu-system-x86_64 -drive format=raw,file=chromeosflex.bin -drive format=qcow2,file=chromeosflex.qcow2 -m 8G -smp 2 -enable-kvm -display "gtk,gl=on,show-cursor=on" -device virtio-vga-gl -usb -device usb-tablet
- Chrome OS Flex live recovery environment will launch:
QEMU Flags Explained:
Once QEMU starts, the Chrome OS Flex installer will load after about 1-2 minutes. You can also use Chrome OS Flex in guest mode by clicking the Browse as Guest button. However, note that guest mode won't save changes between sessions.
3.3: Installing Chrome OS Flex
To install the Chrome OS Flex on Virtual Machine:- When the installer loads, click the Install Chrome OS Flex button (or follow the on-screen prompts to choose between trying and installing the OS). The installer will warn you that the installation will erase data on the hard drive. Since this is a virtual drive, click Install to proceed.
- After installation, the emulator will shut down.
3.4: Booting into Freshly Installed Chrome OS Flex
- Now that Chrome OS Flex is successfully installed in the virtual machine, it's time to boot into the freshly installed operating system from the virtual drive.
- To do this, simply modify the previous QEMU run command by removing the installer drive option -drive format=raw,file=chromeosflex.bin.
- Use the following command to boot directly from the virtual storage drive:
qemu-system-x86_64 -drive format=qcow2,file=chromeosflex.qcow2 -m 8G -smp 2 -enable-kvm -display "gtk,gl=on,show-cursor=on" -device virtio-vga-gl -usb -device usb-tablet
- Press Enter:
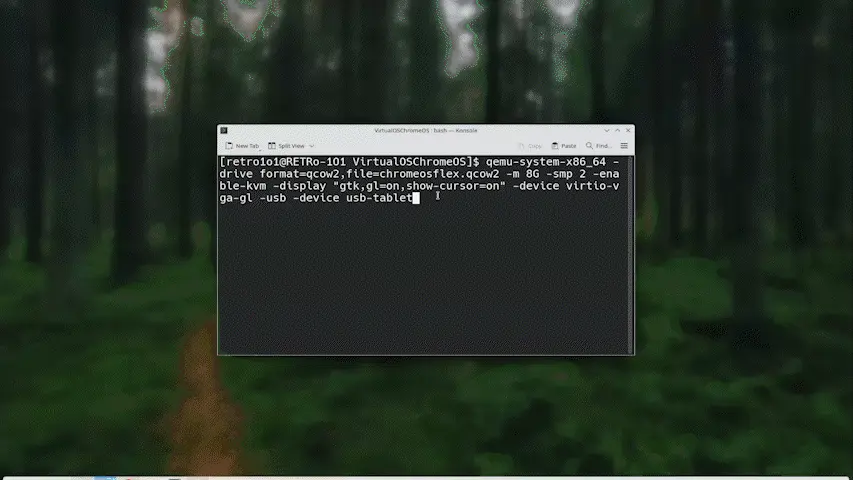
And here you go! Now you have Chrome OS Flex running in your virtual machine. With save state support, every time you shut down QEMU and restart Chrome OS Flex, it picks up right where you left off. Enjoy exploring your new virtual machine environment.
Frequently Asked Questions: Chrome OS Flex on QEMU/KVM
What is Chrome OS Flex and why would I virtualize it?
Chrome OS Flex is Google's lightweight, cloud-first operating system designed to revitalize older PCs and Macs. Virtualizing it allows you to test the platform, evaluate its compatibility, and explore its features without installing it on physical hardware. It provides a safe sandbox to experience Chrome OS Flex before any real deployment.
Are there any limitations when running Chrome OS Flex in a VM?
Yes, there are important caveats. Chrome OS Flex is designed for physical hardware, not virtual machines. Google does not officially support it in a virtual environment. Additionally, features like the Linux development environment require nested virtualization and are not guaranteed to work. Some hardware acceleration features may also behave differently in a VM.
What are the prerequisites for virtualizing Chrome OS Flex?
You need:
- An x86-64 compatible processor (Intel or AMD).
- At least 8GB RAM (16GB recommended).
- Minimum 16GB free disk space for the virtual drive.
- A Linux distribution with QEMU installed.
- Hardware virtualization (VT-x/AMD-V) enabled in BIOS/UEFI.
Is there an OVA file for Chrome OS Flex?
No. Google distributes Chrome OS Flex as a .bin recovery image, not as a pre‑built virtual appliance. You must manually create a VM and attach the image as shown in this guide. However, once you’ve successfully installed Chrome OS Flex on a QEMU virtual drive, you can export that VM as an OVA using tools like qemu-img convert or your hypervisor’s export feature for personal reuse.
How do I download the Chrome OS Flex image?
You can download it directly from Google's servers using this link:
https://dl.google.com/chromeos-flex/images/latest.bin.zip
This link bypasses the registration form and downloads the latest recovery image as a .zip file. After downloading, extract the .bin file using a tool like Ark or any ZIP utility. Rename it to something simple like chromeosflex.bin for easier use.
How do I create a virtual storage drive for Chrome OS Flex?
Use the qemu-img command to create a virtual disk. For a qcow2 format drive (recommended), run:
qemu-img create -f qcow2 chromeosflex.qcow2 16G
Adjust the size (e.g., 20G or 32G) if you need more space. The qcow2 format supports thin provisioning, snapshots, and compression.
What is the QEMU command to boot the Chrome OS Flex installer?
Run the following command from the directory containing both your .bin file and .qcow2 drive:
qemu-system-x86_64 -drive format=raw,file=chromeosflex.bin -drive format=qcow2,file=chromeosflex.qcow2 -m 8G -smp 2 -enable-kvm -display "gtk,gl=on,show-cursor=on" -device virtio-vga-gl -usb -device usb-tablet
This command attaches the installer image (as a raw drive) and the target virtual drive, allocates 8GB RAM and 2 CPU cores, enables KVM acceleration, and sets up a GPU-accelerated display.
What do the different QEMU flags mean?
- -drive format=raw,file=chromeosflex.bin: Attaches the installer image as a raw disk.
- -drive format=qcow2,file=chromeosflex.qcow2: Attaches the target virtual drive in qcow2 format.
- -m 8G: Allocates 8GB RAM to the VM.
- -smp 2: Gives the VM 2 CPU cores.
- -enable-kvm: Enables KVM hardware acceleration for near-native performance.
- -display "gtk,gl=on,show-cursor=on": Uses GTK display with OpenGL acceleration and shows the mouse cursor.
- -device virtio-vga-gl: Adds a VirtIO GPU with OpenGL support.
- -usb and -device usb-tablet: Enable USB support and add a USB tablet for smooth mouse input.
How do I install Chrome OS Flex on the virtual drive?
Once the VM boots from the installer image, you will see the Chrome OS Flex welcome screen. Click the Install Chrome OS Flex button. The installer will warn you that it will erase data on the selected drive (which is your virtual drive). Confirm by clicking Install. The installation will proceed, and the VM will shut down when finished.
What should I do after the installation completes?
After the installation finishes and the VM shuts down, you need to remove the installer drive from the QEMU command. Run the VM again with only the virtual storage drive:
qemu-system-x86_64 -drive format=qcow2,file=chromeosflex.qcow2 -m 8G -smp 2 -enable-kvm -display "gtk,gl=on,show-cursor=on" -device virtio-vga-gl -usb -device usb-tablet
This will boot directly into your newly installed Chrome OS Flex.
Can I save my session in the Chrome OS Flex VM?
Yes. When you shut down the VM (by closing the QEMU window or using the OS shutdown), the state is saved to the virtual drive. The next time you boot with the same .qcow2 drive, Chrome OS Flex will resume exactly where you left off, just like on physical hardware.
Why does the Linux development environment not work inside the VM?
The Linux development environment in Chrome OS Flex requires nested virtualization (running a VM inside a VM). This is not supported by default and may not work reliably even if enabled. Google does not officially support this feature in virtualized environments, so its behavior is unpredictable.
What are the most common mistakes when virtualizing Chrome OS Flex?
- Forgetting to enable KVM acceleration (-enable-kvm), resulting in very poor performance.
- Not extracting the .bin file from the downloaded ZIP.
- Using the wrong drive format in QEMU commands.
- Not having both the installer image and target drive in the same directory.
- Running the installer again after installation by forgetting to remove the -drive format=raw,file=... line.
- Allocating insufficient RAM or disk space.
🎉 Congratulations, your Chrome OS Flex setup is complete!
You have successfully virtualized Chrome OS Flex. This is a great way to explore Google's cloud-first ecosystem securely within your Linux host.
If this guide helped you, subscribe for more step-by-step tutorials.
101 out, I’ll see you in the next one! 🚀