
This guide is part of the MusaBase Virtualization series. For the complete overview, see the Linux Virtualization with QEMU/KVM guide.
The days of sacrificing system performance for the sake of running a second operating system are over. While traditional Type-2 hypervisors often feel sluggish and disconnected from the hardware, leveraging QEMU/KVM allows you to tap into the Linux kernel's native virtualization capabilities, delivering a "bare-metal" experience that makes dual-booting feel like an unnecessary relic of the past.
Hi all, welcome back to MusaBase! In this comprehensive guide, I'll walk you through installing QEMU and creating KVM that deliver near-native performance on Linux. Traditionally, many users have relied on separate installation to run different operating system, which requires restarting your machine every time you switch. With virtualization, you can run multiple environment simultaneously with performance that rivals native hardware. In this guide I'm using Arch Linux with KDE Plasma as its desktop environment, but you can follow this guide on any linux distribution with only minor adjustments to package names or your package manager.
Here's what we're going to achieve in this guide:
- Verifying hardware-assisted virtualization capabilities
- Installing the full QEMU suite along with Virt Manager for a graphical user interface (GUI)
- Configuring QEMU for your user account and optimizing performance
- Creating a virtual machine and installing an operating system (Windows 11) with QEMU
⚡ TL;DR: Install QEMU/KVM and Run Near Native VMs on Linux
A quick reference to set up QEMU with KVM acceleration, launch virt-manager, and install a Windows 11 VM including networking fixes.
-
Ensure CPU virtualization is enabled:
Output should show VT-x or AMD-V. If not, enable in BIOS/UEFI.LC_ALL=C lscpu | grep Virtualization -
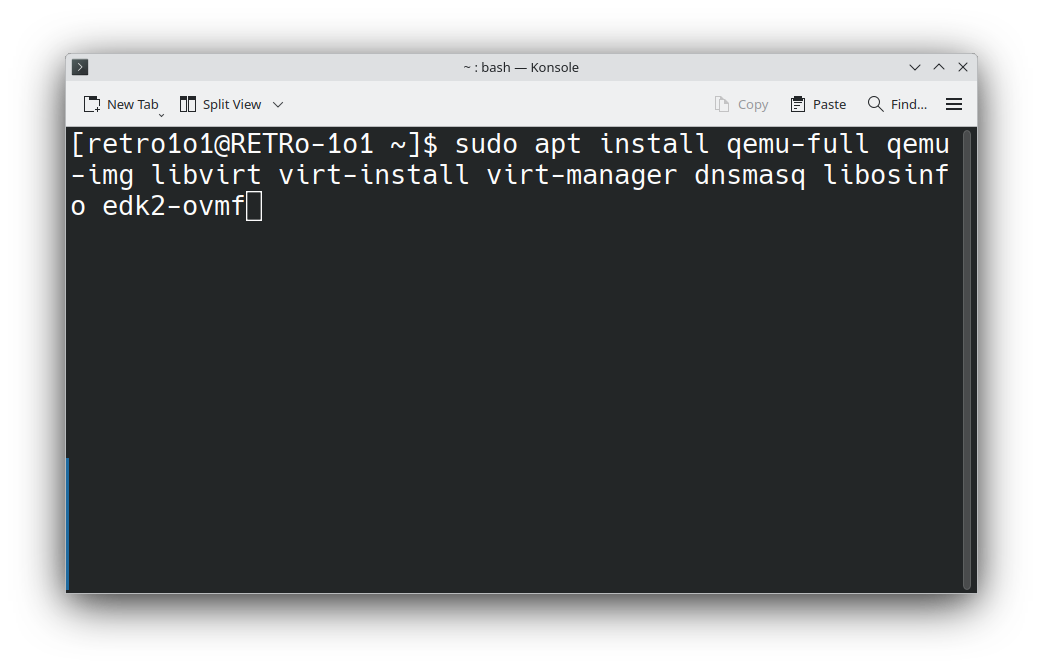
Install packages (choose your distro):
# Arch based sudo pacman -S qemu-full qemu-img libvirt virt-install virt-manager dnsmasq libosinfo edk2-ovmf # Debian/Ubuntu based sudo apt install qemu-system-x86 qemu-utils libvirt-daemon-system libvirt-clients virt-manager virtinst dnsmasq-base libosinfo ovmf # Red Hat based sudo dnf install qemu-kvm qemu-img libvirt virt-install virt-manager dnsmasq libosinfo ovmf -
Enable and start libvirtd:
For non-systemd systems use the appropriate init commands (service/rc-update).sudo systemctl enable --now libvirtd -
Add your user to the libvirt group:
On Debian based you may needsudo usermod -aG libvirt $USERsudo adduser $USER libvirt. Log out and back in to apply. -
Load KVM kernel module:
# Intel CPU sudo modprobe kvm-intel # AMD CPU sudo modprobe kvm_amd -
(Optional) Set libvirt permissions:
Uncomment or add the lines:sudo nano /etc/libvirt/libvirtd.conf
Restart the service:unix_sock_group = "libvirt" unix_sock_rw_perms = "0770"sudo systemctl restart libvirtd -
Launch virt-manager to create and manage VMs:
Use the GUI to create a new VM or run the CLI command below.virt-manager -
Create a virtual disk and start a Windows 11 VM (CLI example):
Place the OVMF firmware files (OVMF.fd, OVMF_VARS.fd) in the same directory or use the full path from# Create a 64GB qcow2 disk qemu-img create -f qcow2 virtualdrive.qcow2 64G # Run the VM with UEFI, KVM, VirtIO GPU, and network qemu-system-x86_64 \ -cpu host -enable-kvm -smp 2 -m 8G \ -drive if=pflash,format=raw,unit=0,file=OVMF.fd,readonly=on \ -drive if=pflash,format=raw,unit=1,file=OVMF_VARS.fd \ -drive file=virtualdrive.qcow2,format=qcow2 \ -drive file=Win11.iso,media=cdrom,readonly=on \ -device virtio-vga-gl -display "gtk,gl=on,show-cursor=on" \ -netdev user,id=net0 -device virtio-net-pci,netdev=net0 \ -usb -device usb-tablet -device usb-kbd \ -device ich9-intel-hda -device hda-duplex/usr/share/ovmf/x64/. -
Fix Windows internet connection:
Inside the Windows VM, open the VirtIO CD and run# Download VirtIO drivers ISO wget https://fedorapeople.org/groups/virt/virtio-win/direct-downloads/archive-virtio/virtio-win-0.1.266.iso # Add it as a second CD-ROM when starting QEMU: -drive file=virtio-win-0.1.266.iso,media=cdrom,readonly=onvirtio-win-gt-x64.exe, select Network drivers, install, and reboot.
💡 Your QEMU/KVM environment is ready. Use virt-manager for easy GUI management or QEMU commands for advanced control. Remember to install the VirtIO network driver to get online in Windows VMs.
What is QEMU?
QEMU, short for Quick Emulator, is a free, open-source emulator and virtualizer that can run entire operating systems or individual programs. It leverages dynamic binary translation to support multiple CPU architectures. Developers use it for cross-platform testing, debugging, and isolated deployments. When paired with KVM, it delivers near-native performance. Its flexibility, portability, and cost-effectiveness make it a top choice over proprietary solutions.
Prerequisites
To run QEMU effectively on Linux, you need a recent 32- or 64-bit Linux distribution. Many full-featured distros, such as Ubuntu, Linux Mint, Fedora, and openSUSE typically come with standard build tools. However, if you're using a minimal system like Arch Linux without the base-devel group, you may need to manually install development tools like GCC, make, and pkg-config.
For those using minimal setups, I have detailed guides on archinstall for minimal Arch Linux and how to install Debian the hard way to ensure all core components are ready. Additionally, make sure you have necessary libraries like glib2.0, libfdt, pixman, and zlib installed on your system.
- Processor: Intel or AMD x86-64-bit compatible with virtualization support.
- RAM: 8GB or more for higher performance.
- Hard Drive: Based on your needs. Basically, you will be allocating space according to the OS or program you will install and run.
- Operating System: Any recent Linux distribution 32-bit or 64-bit.
Hardware Acceleration
- Virtualization Extensions:
- IOMMU Support for Advanced Features (e.g., PCI Passthrough):
- Intel: VT-d is needed.
- AMD: AMD-V is required.
- IOMMU remaps and isolates memory accesses from hardware devices, ensuring that when a PCI card (e.g., GPUs, network cards, sound cards, and storage controllers) or similar device is passed through to a virtual machine, it can only access its designated memory space, boosting performance and security.
- Software vs Hardware Acceleration:
If you don't have enough resources or a capable hardware setup, QEMU also offers software acceleration.
- Software Acceleration: QEMU's TCG emulates CPUs entirely in software, which is significantly slower.
- Hardware Acceleration: Technologies like KVM on Linux allow guest code to run almost natively, delivering much higher performance.
Most modern CPUs, even those from the 2011-2012 era, include built-in virtualization extensions. Many ARM64 processors from 2012 onward also support these features.
If you are not sure whether your CPU supports virtualization, follow these steps:
- Reboot your PC.
- During startup, press the BIOS/UEFI key (commonly F2, F10, F12, Del, Esc, depending on your motherboard).
- Look for sections labeled Advanced, CPU Configuration, Processor Settings, System Configuration, or Security.
- Locate Virtualization Options:
- For Intel CPUs: Look for Intel Virtualization Technology or VT-x.
- For AMD CPUs: Look for AMD Virtualization (AMD-V) or SVM Mode.
- Some systems might also show Intel VT-d (for directed I/O virtualization).
- Enable Virtualization.
- Save Settings and Exit.
- Reboot.
Now, in your Linux terminal, run:
LC_ALL=C lscpu | grep Virtualization
If your CPU doesn't support virtualization, you can still create and use VMs, but they will rely solely on software emulation.
Step 1: Installing QEMU and Core Virtualization Packages
Let's begin the installation of the QEMU package along with its full suite of virtualization tools. Although installing QEMU alone will work, adding a few extra packages can significantly enhance your virtualization experience.
Installing QEMU Packages
For the best daily VM experience, I recommend installing the following packages. Use the appropriate command for your Linux distribution:
Arch-based distros:
sudo pacman -S qemu-full qemu-img libvirt virt-install virt-manager dnsmasq libosinfo edk2-ovmfUbuntu/Debian-based distros:
sudo apt install qemu-system-x86 qemu-utils libvirt-daemon-system libvirt-clients virt-manager virtinst dnsmasq-base libosinfo ovmfRed Hat-based distros:
sudo dnf install qemu-kvm qemu-img libvirt virt-install virt-manager dnsmasq libosinfo ovmf

Note: Replace the pacman, apt, or dnf package manager command with the one used on your Linux distribution.
Package Name Reference Table
Since package names can vary between distributions, refer to the table below for a quick overview:
| Arch-based | Ubuntu/Debian-based | Red Hat-based |
|---|---|---|
| qemu-full | qemu-system-x86, qemu-utils |
qemu-kvm, qemu-img |
| qemu-img | qemu-utils | qemu-img |
| libvirt | libvirt-daemon-system, libvirt-clients |
libvirt |
| virt-install | virtinst | virt-install |
| virt-manager | virt-manager | virt-manager |
| dnsmasq | dnsmasq-base | dnsmasq |
| libosinfo | libosinfo-bin | libosinfo |
| edk2-ovmf | ovmf | ovmf |
QEMU Suite
Note: Avoid running VMs as the root user to maintain security and system stability.
Step 2: Enabling and Configuring Core Virtualization Services
Now we need to enable essential services and adjust configuration files for the packages we installed in Step 1. Follow these steps:
2.1: Enable Virtualization Services:
- Open your terminal and run the following command to start and enable the libvirtd service immediately:
sudo systemctl enable --now libvirtd


Verify your Init System
- To verify which Init System your Linux system is using, run:
ps --no-headers -o comm 1
For SysVinit:
- Start the libvirtd service with:
sudo /etc/init.d/libvirtd start
# or
sudo service libvirtd start - Enabling the service so it automatically starts on boot:
- This varies significantly between distributions.
- On Debian-based systems that use SysVinit:
sudo update-rc.d libvirtd defaults
# or
sudo update-rc.d libvirtd enable -
- On Red Hat-based systems:
sudo chkconfig libvirtd on
For OpenRC:
- Starting the service:
sudo rc-service libvirtd start - Enabling the service so it automatically starts on boot:
sudo rc-update add libvirtd default
- The SysVinit "enable" step is the most variable. Distributions using SysVinit have implemented their own variations of how runlevels and service startup are managed.
- These commands assume the libvirtd service has been properly installed. If the service files are missing, these commands will fail.
2.2: Add User to the Libvirt Group:
By default, libvirt requires root privileges to manage VMs. Adding your user to the libvirt group allows you to manage virtual machines without sudo, which is both safer and more convenient.
- Arch-based distros & Red Hat-based distros
- To add your user to the libvirt group, run:
sudo usermod -aG libvirt $USER

Ubuntu/Debian-based distros:
- If sudo usermod -aG libvirt $USER doesn't work:
sudo adduser $USER libvirt
2.3: Load KVM Kernel Modules:
These modules are required for KVM to work because they enable the CPU's hardware virtualization features. If these modules aren't loaded, your system can't use KVM, and virtualization won't work properly.
- For Intel CPUs, type:
sudo modprobe kvm-intel

- For AMD CPUs, type:
sudo modprobe kvm_amd

2.4: Configure Libvirt (Optional):
- Open the libvirt configuration file with your preferred text editor (e.g., kate or nano):
kate /etc/libvirt/libvirtd.conf
OR
nano /etc/libvirt/libvirtd.conf

- Use the editor's search function (Ctrl + F) to locate and uncomment/modify these lines by removing the leading # symbol:
unix_sock_group = "libvirt"
unix_sock_rw_perms = "0770"


2.5: Restart the Libvirt Service:
- Apply any configuration changes by restarting the libvirtd service:
sudo systemctl restart libvirtd

If you're using a different init system, adjust the command accordingly. For example:
- SysVinit:
sudo service libvirtd restart
# OR
sudo /etc/init.d/libvirtd restart - OpenRC:
sudo rc-service libvirtd restart
Step 3: Launch QEMU & Virt-Manager
Launch Virt-Manager:
- Finally, test your setup by launching virt-manager with:
virt-manager


We have now successfully configured a working virtual machine environment. By following the above steps, we ensure that KVM is properly enabled, users have the right permissions, and virtual machines can be created and managed efficiently.
Understanding QEMU Basics
Before you start using QEMU in depth, here are a few important points to understand first:
QEMU Core:
- QEMU itself is primarily a command-line tool. This means that its fundamental operations rely on typing commands into a terminal. So in its basic form, there is no Graphical User Interface.
- However, QEMU does have a UI subsystem that allows for different user interfaces to be created.
- Refer to QEMU documentation for more structured details and advanced configurations.
Graphical User Interfaces (GUI) and Launchers:
- Several GUIs are available to simplify QEMU usage. The most prominent example is virt-manager.
- virt-manager provides a user-friendly interface for managing virtual machines, and it heavily relies on QEMU and libvirt.
- Therefore, while QEMU's core is command-line based, it's frequently used with GUIs that make it more accessible.
Step 4: Installing Windows in QEMU's Virtual Machine
Now, let's test if our setup actually works by installing an Operating System in our Virtual Machine. This process involves:
- Creating a virtual hard drive for the OS installation.
- Attaching an OS image.
- Allocating RAM and CPU cores.
- Passing USB devices (mouse, keyboard, audio devices).
- Enabling hardware acceleration for better performance.
I'll demonstrate using Windows 11, but you can use any OS.ISO file. You can also try recovery images (usually in .bin or .img formats) with a few tweaks as well.
We can use Virt Manager through 2 different approaches to create virtual machines:
4.1: GUI Approach
With a GUI, things are much easier. We can select the options we want for our virtual machine, and once everything is set up, simply click the Play button.
4.1.1: Select CPU Architecture and Installation Method
- Open Virt-Manager: Launch the application from your desktop environment or by running virt-manager in a terminal.
- Create a New VM: Click the Create a New Virtual Machine icon 🖥️ in the toolbar.
- Choose Installation Source:
- Import Existing Disk Image: Select this if you already have an OS image (ISO or IMG) prepared.
- Local Install Media: Choose this to install a fresh operating system from an ISO or other bootable image.


- Pick Architecture: At the Select Architecture options, select the CPU architecture for your VM, such as x86_64, aarch64, ARM, or s390x. For this guide, I am choosing Local Install Media with x86_64, then click Forward.


4.1.2: Create a New Storage Pool
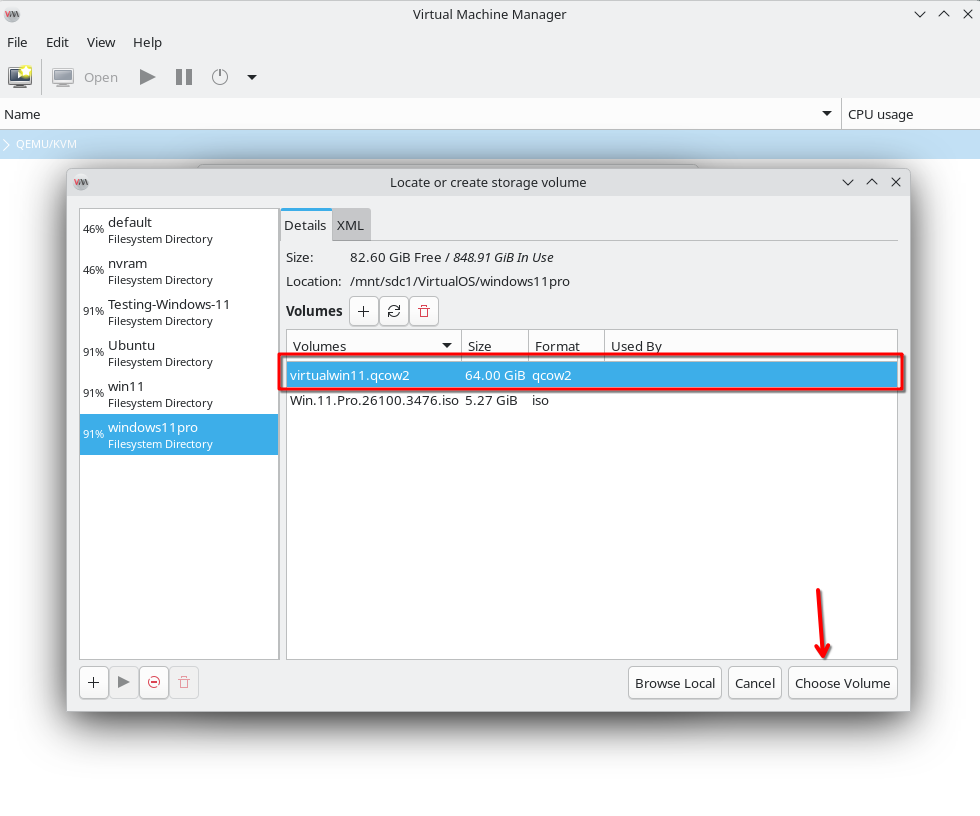
A storage pool in libvirt is a way to organize and manage your VM disks and ISOs:
- On step 2 screen, click on Browse to open the Pools window.
- Click the ➕ Add icon to define a new pool.
- On the Add a New Storage Pool screen, you can name your pool.
- Name your pool, choose the Directory pool type, and set its path (default is /var/lib/libvirt/images/pool). To keep things tidy, create a custom directory, like (/mnt/sdc1/VirtualOS/windows11pro).
- Click Finish to create and activate the pool.


4.1.3: Select Operating System Image
- Back in the VM creation wizard, select your newly created storage pool.
- If your ISO isn't already in the pool, place it there now, then click Browse and select it.
- Virt-Manager will auto-detect the OS; if not, enter the OS name manually and click Forward.
- I have already placed my windows11.iso file inside this directory, so I will select it.


4.1.4: Allocate RAM and CPUs
- On the next screen, allocate memory and CPU cores according to your needs (e.g., 8 GB RAM, 4 CPUs), then click Forward.


4.1.5: Create a Virtual Storage Drive
- In the storage configuration step, choose Select or create custom storage and click Manage.
- Select your storage pool, click ➕ Create Volume, and specify:
- Click Finish, then Choose Volume, and Forward.


4.1.6: Finalizing the VM Setup
- On the final screen, name your VM (e.g., "Windows 11 VM") and confirm the Network Type (default: Virtual network default').
- (Optional) Tick the Customize configuration before install to tweak hardware settings. For a basic setup, leave defaults.
- Click Finish to launch your VM with the specified settings.


4.2. CLI Approach
With the CLI approach, we have to type and configure everything manually, but it also helps us understand the underlying framework of QEMU.
4.2.1: Getting things ready
Before booting QEMU with the Windows 11 ISO, we need 2 files:
- Windows 11 ISO file.
- Virtual hard drive.
I have the ISO file already, so I will create a virtual hard drive. But before that, I would recommend creating a separate empty folder for each OS in which you will store operating system image file, virtual hard disk file, and any other files needed for OS to run in QEMU. For instance, I have an empty folder named VirtualWindows11. I will cd into this folder from my terminal like this:
cd /mnt/sdc1/VirtualWindows11Now, in this folder, I will create a virtual disk of 64GB of storage for Windows 11.
4.2.2: Creating Virtual Drive with QEMU
- Next, create a 64GB virtual disk for Windows 11 with the following command:
qemu-img create -f qcow2 virtualdrive.qcow2 64G

4.2.3: Verifying Required Files
Ensure you have the following additional OVMF Firmware files (needed for UEFI support):
- OVMF.fd
- OVMF_VARS.fd
I have already saved my windows11.iso file inside my VirtualWindows11 folder with two additional .fd format files. These files are needed to run modern operating systems that require UEFI support, such as recent versions of Windows and Linux.
Please see the image below for clarification:

These 2 additional files come with the ovmf package and are usually located in directories like:
- /usr/share/ovmf/x64/
- /usr/share/ovmf/
- /usr/share/qemu-firmware/
If you can't locate them, run:
sudo find / -name OVMF_VARS.fd
#OR
sudo find / -name OVMF_CODE.fdNote: On some distributions (for example, Arch Linux) the filenames might be slightly different (e.g., OVMF.4m.fd and OVMF_VARS.4m.fd). In such cases, remove the ".4m" for simplicity.
4.3: Install Windows 11 on QEMU VM
Now that we have everything ready, let's install Windows 11 on QEMU.
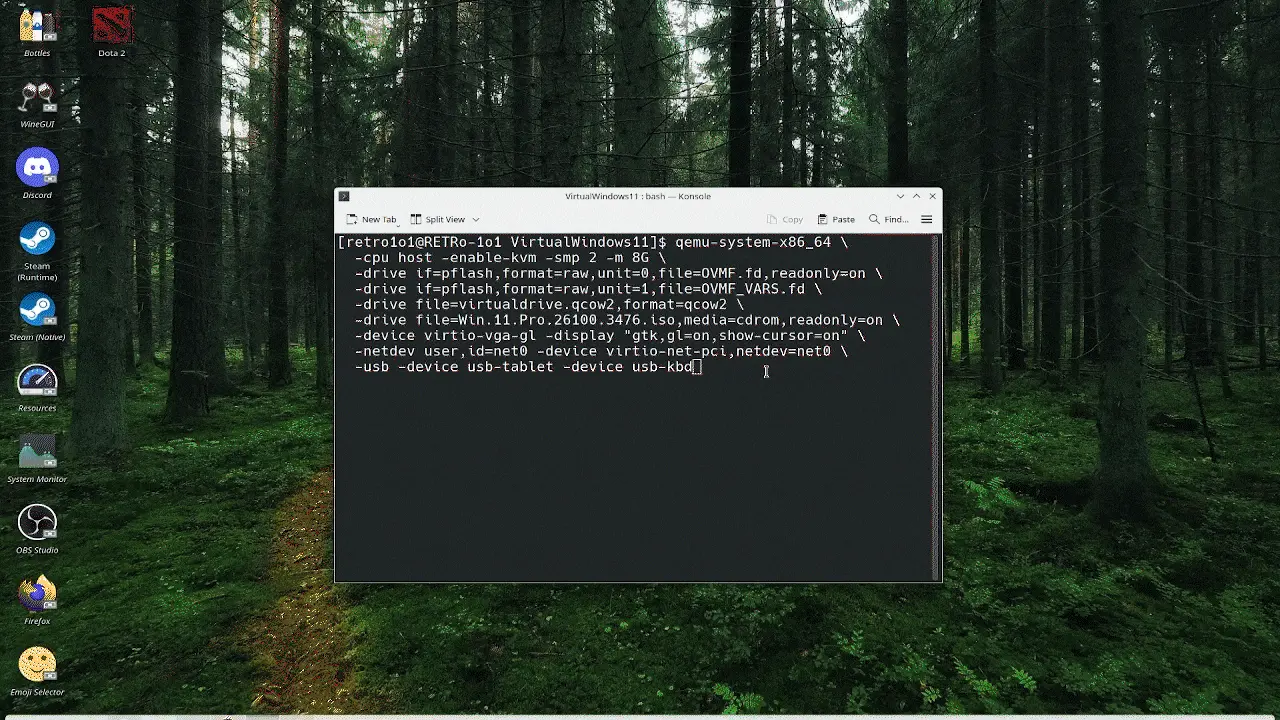
- Open a terminal and type the following command:
qemu-system-x86_64 \
    -cpu host -enable-kvm -smp 2 -m 8G \
    -drive if=pflash,format=raw,unit=0,file=OVMF.fd,readonly=on \
    -drive if=pflash,format=raw,unit=1,file=OVMF_VARS.fd \
    -drive file=virtualdrive.qcow2,format=qcow2 \
    -drive file=Win11Pro.iso,media=cdrom,readonly=on \
    -device virtio-vga-gl -display "gtk,gl=on,show-cursor=on" \
    -netdev user,id=net0 -device virtio-net-pci,netdev=net0 \
    -usb -device usb-tablet -device usb-kbd \
    -device ich9-intel-hda -device hda-duplex
QEMU Flags
4.4: Optional: Fixing Internet Connection in Windows 11 VM
If you follow along and install Windows 11 with the optional flags, you may experience internet connection issues inside the VM. This is because Windows needs VirtIO Network Drivers to properly recognize and use the virtual network adapter. You can easily fix this by installing the VirtIO drivers within your virtual machine. These drivers are available from the Fedora Project's website and are usually distributed as an ISO image.
- To download the VirtIO Drivers, visit TheFedoraPeople Official Site.
Or copy and paste the link below. It will take you to the fedorapeople.org website page, and from there you can get the ISO image for drivers.
https://fedorapeople.org/groups/virt/virtio-win/direct-downloads/archive-virtio/Make sure you download the latest version of the ISO file (the filename may be something like virtio-win-0.1.266.iso).


Once downloaded, copy the virtio-win-0.1.266.iso file into your VirtualWindows11 folder or directory and run QEMU again with this new VirtIO Win ISO image.
- We just need to add an extra -drive flag to the previous qemu-system command:
-drive file=virtio-win-0.1.266.iso,media=cdrom,readonly=on - The full command will now look like this:
qemu-system-x86_64 \
    -cpu host -enable-kvm -smp 2 -m 8G \
    -drive if=pflash,format=raw,unit=0,file=OVMF.fd,readonly=on \
    -drive if=pflash,format=raw,unit=1,file=OVMF_VARS.fd \
    -drive file=virtualdrive.qcow2,format=qcow2 \
    -drive file=virtio-win-0.1.266.iso,media=cdrom,readonly=on \
    -device virtio-vga-gl -display "gtk,gl=on,show-cursor=on" \
    -netdev user,id=net0 -device virtio-net-pci,netdev=net0 \
    -usb -device usb-tablet -device usb-kbd \
    -device ich9-intel-hda -device hda-duplex
Install VirtIO-Win Drivers in Windows 11 VM
Follow these steps:
- Open My Computer.
- There you should have two CD drives: one containing Windows11Installer.ISO and the second one containing VirtIO-Win.
- Open the CD drive which contains the virtio-win image; it will be named something like CD Drive virtio-win, etc.
- Open the virtio-win-gt-x64.exe file.


- Select Network and press Next to install.
- It will take a short time, and you will have network drivers installed for virtio-network.
- Restart the VM or Windows inside the VM so Windows can apply the changes.


And there you have it! Everything is configured and running. The VirtIO-Win utility offers various drivers for different scenarios when running Windows in a virtual machine. It can even pass through a single GPU features (which I've covered in another article). Now you have a near-native running virtual machine in Linux. Feel free to experiment with different QEMU flags or options to see how your machine or the operating system inside reacts.
QEMU Terminal Commands and Options
- For a full list, check the QEMU man page (man qemu-system-x86_64) command, or visit QEMU Documentation. Options may vary slightly between QEMU versions.
Below are some common, everyday QEMU terminal options:
Basic System Emulation:
qemu-system-x86_64 # Emulates a 64-bit x86 (AMD64/Intel64) system.
qemu-system-arm # Emulates a 32-bit ARM system.
qemu-system-aarch64 # Emulates a 64-bit ARM system.
System Configuration:
-m "size": Allocate RAM (e.g., -m 4G for 4GB).
-smp "n": Set CPU cores (e.g., -smp 4 for 4 cores).
-cpu "model": Specify CPU model (e.g., -cpu host for passthrough, -cpu qemu64).
-machine "type": Select emulated machine (e.g., -machine q35, -machine virt,accel=kvm).
-accel "type": Enable acceleration (e.g., -accel kvm, -accel tcg).
-name "Windows": Name the VM (for monitoring).
Storage Options:
-drive file=disk.qcow2,format=qcow2,if=virtio
file="path/to/file": Disk image path.
format="type": Image format (e.g., qcow2, raw).
if="interface": Interface type (e.g., virtio, ide, scsi).
media="type": disk or cdrom.
-cdrom "file": Attach a CD/DVD image (e.g., -cdrom ubuntu.iso).
-boot "order": Set boot order (e.g., -boot order=c,menu=on).
Display/Graphics:
-display "type": Select display backend (e.g., gtk, sdl, none, cocoa).
-vga "model": Set VGA card (e.g., virtio, std, qxl).
-nographic: Disable graphical output (use terminal).
-spice "options": Enable SPICE remote desktop (e.g., -spice port=5900).
-device "usb-tablet": Improve mouse integration (avoids cursor drift).
Networking:
-netdev "type",id="name": Define a network backend.
Types: user (NAT), tap (bridged), socket.
Example: -netdev user,id=net0 -device virtio-net-pci,netdev=net0.
-nic "options": Simplified network setup (e.g., -nic user, model=virtio).
-net user -net nic: Legacy networking (NAT with virtual NIC).
USB/Peripherals:
-usb: Enable USB bus.
-device usb-host,vendorid=0x1234,productid=0x5678: Passthrough a USB device.
-device usb-mouse: Emulate a USB mouse.
Audio:
-audiodev "backend",id="name": Configure audio backend (e.g., pa, alsa).
-soundhw "model": Emulate audio hardware (e.g., hda, ac97).
Advanced Options:
-kernel "vmlinuz": Directly boot a Linux kernel.
-initrd "file": Specify an initramfs.
-append "cmdline": Kernel command-line arguments.
-monitor "type": Expose QEMU monitor (e.g., -monitor stdio).
-snapshot: Run in temporary mode (no disk changes).
-loadvm "snapshot": Restore a saved VM state.
Example Commands
1. Basic Boot:qemu-system-x86_64 -smp 2 -m 8G -drive file=OS.qcow2,format=qcow2 -enable-kvm2. Boot from ISO:
qemu-system-x86_64 -m 8G -cdrom steamos.iso -drive file=disk.qcow2,format=qcow23. Networked VM:
qemu-system-x86_64 -nic user,model=virtio -drive file=disk.qcow2,format=qcow2Frequently Asked Questions: QEMU/KVM on Linux
What is the difference between QEMU and KVM?
QEMU (Quick Emulator) is a generic machine emulator that can run operating systems for different architectures through software emulation. KVM (Kernel-based Virtual Machine) is a Linux kernel module that enables hardware-assisted virtualization.
When used together, QEMU provides the device emulation while KVM provides the CPU acceleration, allowing virtual machines to run at near-native performance. Without KVM, QEMU uses software emulation (TCG) which is significantly slower.
How do I check if my CPU supports hardware virtualization?
Run the following command in your terminal:
LC_ALL=C lscpu | grep Virtualization
- For Intel CPUs, you should see: Virtualization: VT-x
- For AMD CPUs, you should see: Virtualization: AMD-V
If nothing appears, you need to enable virtualization in your BIOS/UEFI settings (look for VT-x, AMD-V, or SVM Mode).
Why am I getting "Permission denied" when trying to create or run VMs?
This usually means your user is not in the libvirt group. Fix it with:
sudo usermod -aG libvirt $USER
For Debian/Ubuntu systems, you might need:
sudo adduser $USER libvirt
Important: Log out and log back in (or restart) for the group changes to take effect.
What's the difference between qcow2 and raw disk formats?
- qcow2 (QEMU Copy-On-Write version 2): Supports features like snapshots, compression, encryption, and grows dynamically as data is written. It's more flexible but has a slight performance overhead.
- raw: Simpler format with better performance since it's closer to the actual disk layout. However, it allocates the full size immediately and doesn't support snapshots natively.
For most users, qcow2 is recommended because of its flexibility and space efficiency.
Why does my Windows VM have no internet connection?
Windows doesn't include built-in drivers for VirtIO network adapters. You need to install the VirtIO drivers:
- Download the latest virtio-win ISO from Fedora People.
- Attach it as a second CD-ROM to your VM: -drive file=virtio-win.iso,media=cdrom
- Inside Windows, open the VirtIO CD and run virtio-win-gt-x64.exe.
- Select Network and install the drivers.
- Restart the VM.
How do I enable UEFI boot for my VM instead of legacy BIOS?
You need the OVMF firmware files. Install the ovmf package, then add these flags to your QEMU command:
-drive if=pflash,format=raw,unit=0,file=/usr/share/ovmf/x64/OVMF.fd,readonly=on
-drive if=pflash,format=raw,unit=1,file=OVMF_VARS.fd
The exact paths may vary by distribution. In virt-manager, you can select UEFI in the VM creation wizard under "Customize configuration".
My VM is running very slowly. How can I improve performance?
- Ensure KVM is enabled with the -enable-kvm flag.
- Use -cpu host to pass through your host CPU features.
- Allocate enough RAM and CPU cores (-m 4G -smp 4).
- Use virtio drivers for disk and network instead of emulated hardware.
- For disk I/O, consider using raw format instead of qcow2 if you don't need snapshots.
- Enable IOThreads for better disk performance in virt-manager.
How do I share files between host and guest?
There are several methods:
- VirtIO-FS (modern, fast): Add -virtiofs to your QEMU command and mount inside guest.
- 9p (older, simple): Add -virtfs options.
- Network shares: Set up Samba/NFS on host and access from guest.
- SPICE folder sharing: Available in virt-manager with SPICE enabled.
For Windows guests, Samba shares are often the easiest solution.
What is the purpose of OVMF_VARS.fd? Why do I need a copy for each VM?
OVMF_VARS.fd stores UEFI variables for your VM, including boot order, secure boot keys, and other firmware settings. Each VM should have its own copy because:
- Changes made by one VM (like installing Windows) won't affect others.
- You can have different UEFI configurations per VM.
- It prevents corruption of the master firmware file.
Simply copy the original file for each new VM: cp /usr/share/ovmf/x64/OVMF_VARS.fd ./myvm_vars.fd
Can I passthrough my GPU to a Windows VM for gaming?
Yes, but it requires:
- An IOMMU-capable CPU and motherboard (VT-d for Intel, AMD-Vi for AMD).
- A dedicated GPU for the VM (or a second GPU if you want to keep your host display).
- Proper IOMMU grouping and VFIO driver binding.
This is an advanced topic. Check out the guide linked in the "What's Next" section of this article for Single GPU Passthrough.
How do I create a snapshot of my VM?
If you're using qcow2 disk format, you can create snapshots easily:
From command line:
qemu-img snapshot -c snapshot_name virtualdrive.qcow2
From virt-manager: While VM is running, go to View → Snapshots and click the camera icon.
To revert to a snapshot:
qemu-img snapshot -a snapshot_name virtualdrive.qcow2
Why do I need dnsmasq for QEMU/KVM?
dnsmasq provides DHCP and DNS services for the default virtual network. When you use -netdev user,id=net0 or the default NAT network in virt-manager, dnsmasq automatically assigns IP addresses to your VMs and handles DNS resolution. Without it, your VMs would need manual network configuration.
How do I uninstall a VM completely?
- Shut down the VM.
- Delete the VM definition: In virt-manager, right-click the VM and select Delete. From CLI: virsh undefine vm-name
- Delete the disk image: Manually delete the .qcow2 or .img file from your storage pool directory.
- Remove OVMF_VARS copy if you created one specifically for this VM.
What's the difference between virt-manager and command-line QEMU?
- virt-manager is a graphical tool that simplifies VM management. It uses libvirt behind the scenes and is great for beginners or everyday tasks.
- Command-line QEMU gives you more fine-grained control and is useful for scripting, automation, or when you need specific features not exposed in virt-manager.
Both use the same underlying technology; virt-manager just adds a user-friendly layer.
How do I fix "Error starting domain: Requested operation is not valid" in virt-manager?
This error often occurs due to permission issues or service problems. Try these steps:
- Ensure libvirtd is running: sudo systemctl status libvirtd
- Restart the service: sudo systemctl restart libvirtd
- Check if your user is in the libvirt group (see FAQ above).
- Verify that virtualization is enabled in BIOS and KVM modules are loaded: lsmod | grep kvm
Can I run QEMU without a graphical interface on a headless server?
Absolutely! Use the -nographic flag to disable graphical output. For remote management, you can:
- Use VNC: Add -vnc :1 to enable VNC on port 5901.
- Use SPICE: Add -spice port=5900,addr=0.0.0.0,disable-ticketing.
- Use virt-manager remotely by connecting to the libvirt service over SSH.
What are the minimum system requirements for running Windows 11 in QEMU?
For a usable Windows 11 VM, you should have at minimum:
- CPU: 2 cores with virtualization support.
- RAM: 4GB for the VM + host overhead (total 8GB+ recommended).
- Storage: 64GB free space for the virtual disk.
- TPM: Windows 11 requires TPM 2.0. You can emulate it with swtpm package.
- UEFI: Windows 11 needs UEFI firmware (OVMF).
The guide uses 8GB RAM and 64GB storage, which works well.
🎉 Congratulations, your QEMU/KVM setup is complete!
You now have a fully functional virtualization environment on your Linux system. Unlike traditional methods, this setup allows you to run multiple environments concurrently with near-native performance, providing a solid foundation for advanced virtualization.
Don't stop here—test it, tweak it, and push QEMU to its limit. If you face any issues, feel free to comment below or reach out via the contact page.
101 out, I’ll see you in the next one! 🚀