
This guide is part of the MusaBase Virtualization series. For the complete overview, see the Linux Virtualization with QEMU/KVM guide.
The Steam Deck has revolutionized handheld gaming, but its true power lies in its specialized Linux-based operating system. You don't need a physical handheld to explore the "Game Mode" interface or test software compatibility; by virtualizing the Deck’s environment, you can create a safe sandbox to experiment with the future of Linux gaming directly from your desktop.
Hi all, welcome to my blog, MusaBase! In this article, I'll walk you through installing SteamOS on a Virtual Machine using QEMU/KVM in Linux. I'm using Arch Linux btw! but you can follow this guide on any Linux distribution. In this guide you'll learn:
- Creating a Virtual Hard Disk and Downloading SteamOS files
- Attaching OVMF files for UEFI Boot support
- SteamOS Installation, Updates, and PGP Verifications
- Disabling SteamOS "Game Mode" for Desktop use in VM
- Installing Packages and Testing Virtual Machine capabilities
This ultimate guide is designed to demystify the process of running Valve's OS in a virtualized environment. Whether you're a developer or a curious gamer, by the end of this walkthrough, you'll have a fully functional SteamOS environment ready for testing.

⚡ TL;DR: Install SteamOS on QEMU/KVM Virtual Machine
A quick reference for the essential commands to download SteamOS, create a virtual disk, install the OS, bypass Gaming Mode, and configure the system – from extraction to a fully updated KDE Plasma desktop.
-
Download and extract the SteamOS recovery image:
tar -xjf steamOS-recovery-image.bz2 -
Create a virtual hard disk (adjust size as needed):
qemu-img create -f qcow2 steamOSDrive.qcow2 16G -
Run QEMU with the recovery image to start the installer:
After booting, choose Reimage Steam Deck (older) or Wipe Devices & Install SteamOS (newer) and proceed. Click Cancel instead of rebooting when finished.qemu-system-x86_64 \ -cpu host -enable-kvm -smp 2 -m 8G \ -drive if=pflash,format=raw,unit=0,file=OVMF.fd,readonly=on \ -drive if=pflash,format=raw,unit=1,file=OVMF_VARS.fd \ -drive file=SteamOS.img,format=raw \ -drive if=none,id=nvme0,file=steamOSDrive.qcow2 \ -device nvme,drive=nvme0,serial=badbeef \ -display "gtk,gl=on" \ -device usb-tablet -usb -
Bypass Gaming Mode – set KDE Plasma as default session (required for older versions):
cd /dev sudo steamos-chroot --disk nvme0n1 --partset A --no-overlay steamos-readonly disable echo '[Autologin]' > /etc/sddm.conf.d/zz-steamos-autologin.conf echo 'Session=plasma.desktop' >> /etc/sddm.conf.d/zz-steamos-autologin.conf steamos-readonly enable exit sudo steamos-chroot --disk nvme0n1 --partset B --no-overlay steamos-readonly disable echo '[Autologin]' > /etc/sddm.conf.d/zz-steamos-autologin.conf echo 'Session=plasma.desktop' >> /etc/sddm.conf.d/zz-steamos-autologin.conf steamos-readonly enable exit reboot -
Boot the installed system (remove the installer image from the command):
qemu-system-x86_64 \ -cpu host -enable-kvm -smp 2 -m 8G \ -drive if=pflash,format=raw,unit=0,file=OVMF.fd,readonly=on \ -drive if=pflash,format=raw,unit=1,file=OVMF_VARS.fd \ -drive if=none,id=nvme0,file=steamOSDrive.qcow2 \ -device nvme,drive=nvme0,serial=badbeef \ -display "gtk,gl=on" \ -device usb-tablet -usb -
First boot configuration – root password, package keys, and system update:
The update may take 5–10 minutes. Reboot afterwards.passwd sudo pacman-key --init sudo pacman-key --populate archlinux sudo pacman-key --populate holo sudo steamos-readonly disable sudo pacman -Syu steamos-update -
If using an older SteamOS version, reapply the KDE Plasma default after updates:
sudo steamos-chroot --partset other mount -o remount,rw / steamos-readonly disable echo '[Autologin]' > /etc/sddm.conf.d/zz-steamos-autologin.conf echo 'Session=plasma.desktop' >> /etc/sddm.conf.d/zz-steamos-autologin.conf steamos-readonly enable exit reboot
💡 Newer SteamOS versions (3.7.7+) retain KDE Plasma automatically; steps 4 and 7 are only mandatory for older images. Always keep a backup of your virtual drive before major upgrades. For more details, see the FAQ section.
Prerequisites
To achieve near-native performance when running SteamOS on a virtual machine, a fully-optimized QEMU environment is essential. While QEMU can technically run on Windows, leveraging the full power of KVM (Kernel-based Virtual Machine) is far more efficient on a Linux host.
If you haven't configured your virtualization stack yet, I highly recommend setting up QEMU/KVM to ensure your hardware acceleration is properly enabled.
For those who don't have a Linux environment ready, Arch Linux is an excellent choice for a lightweight and up-to-date host system. In addition to Arch, I'm using KDE Plasma as my desktop environment.
System Specifications:
- Processor: Intel or AMD 64-bit capable and should support hardware-assisted virtualization.
- RAM: 4GB or more.
- Hard Drive: For the OS alone, 16GB; for further testing and gaming, 200GB.
- Operating System: Any recent Linux distribution (32-bit or 64-bit), although I'm using 64-bit.
- Virtual Tool: QEMU.
Step 1: Acquire SteamOS Image
We can download the SteamOS image from Steam's official SteamOS page. Note that the SteamOS recovery image is provided in BZIP2 format. After downloading, simply extract the archive to obtain the .img file.


Extract SteamOS Image
- Run the following command:
tar -xjf steamOS-recovery-image.bz2


Step 2: Setting Up the Environment for SteamOS Virtualization
This step is optional; you can skip this step and proceed directly to the installation if you wish. However, I recommend creating an empty folder to store your SteamOS image, virtual hard drive, and the necessary OVMF files for UEFI. (SteamOS recommends using UEFI firmware).
Creating a Virtual Drive with QEMU
I am going to create a virtual drive in QCOW2 format. (Feel free to use your preferred format if desired).
- To create a virtual drive with QEMU, open your terminal and run:
qemu-img create -f qcow2 steamOSDrive.qcow2 16G
Now, your folder should contain the following four files:

Step 3: Installing SteamOS on QEMU
- For not mixing things up, gather all files in a dedicated folder. I've already gathered all my files in a dedicated folder.
- Next, open your terminal in your SteamOS folder and run QEMU with the following command:
qemu-system-x86_64 \ -cpu host -enable-kvm -smp 2 -m 8G \ -drive if=pflash,format=raw,unit=0,file=OVMF.fd,readonly=on \ -drive if=pflash,format=raw,unit=1,file=OVMF_VARS.fd \ -drive file=SteamOS.img,format=raw \ -drive if=none,id=nvme0,file=steamOSDrive.qcow2 \ -device nvme,drive=nvme0,serial=badbeef \ -display "gtk,gl=on" \ -device usb-tablet -usbQEMU Flags:
- After running the above command, QEMU will launch with all specified flags and load the SteamOS recovery image.
- Within a few seconds, you will see the SteamOS Desktop Screen, where you can proceed to install SteamOS.
- On the desktop, you should see four options:
- Clear local user data
- Repair SteamOS Install
- Terminal with repair tools
- Wipe Devices & Install SteamOS


Expand for Older Version (3.5.7)
Note for SteamOS older versions: These file names are for an old SteamOS version. The exact version was steamdeck-repair-20231127.10-3.5.7.img.bz2
- Clear local user data
- Reimage Steam Deck
- Reinstall SteamOS
- Terminal with repair tools
- To begin installing SteamOS on QEMU, open Reimage Steam Deck and click Proceed.


To begin installing SteamOS on QEMU, open Wipe Devices & Install SteamOS and click Proceed. The rest of the steps for installing SteamOS on QEMU are all the same. We still need to disable the default gaming mode and set KDE Plasma as the default desktop session to use it on a VM.
Note: After the installation is complete, the system will prompt you to reboot to finalize the process. Click the Cancel button instead. This is because the reboot would normally try to launch into Gaming Mode, which won't work inside a VM, so we need to change the default desktop session.
Bypassing SteamOS Gaming Mode Boot
Fortunately, we can use the Recovery Image's KDE Plasma Session to enter a chroot environment.
- Inside QEMU, press Ctrl + Alt + G to grab or return the input focus.
- Press Ctrl + Alt + T to open a terminal inside SteamOS.
- In the SteamOS terminal, run the following commands consecutively:
cd /dev
sudo steamos-chroot --disk nvme0n1 --partset A --no-overlay
steamos-readonly disable
echo '[Autologin]' > /etc/sddm.conf.d/zz-steamos-autologin.conf
echo 'Session=plasma.desktop' >> /etc/sddm.conf.d/zz-steamos-autologin.conf
steamos-readonly enable
exit

sudo steamos-chroot --disk nvme0n1 --partset B --no-overlay
steamos-readonly disable
echo '[Autologin]' > /etc/sddm.conf.d/zz-steamos-autologin.conf
echo 'Session=plasma.desktop' >> /etc/sddm.conf.d/zz-steamos-autologin.conf
steamos-readonly enable
exit
reboot


Step 4: Boot into SteamOS and Further Configuration
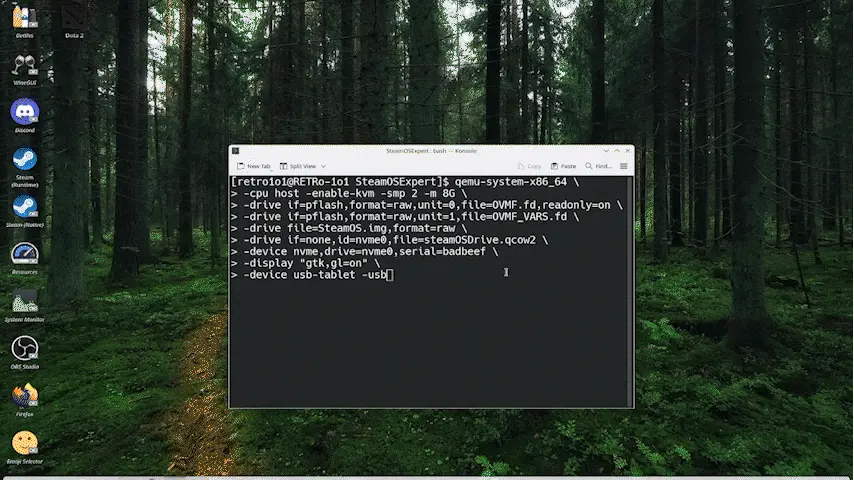
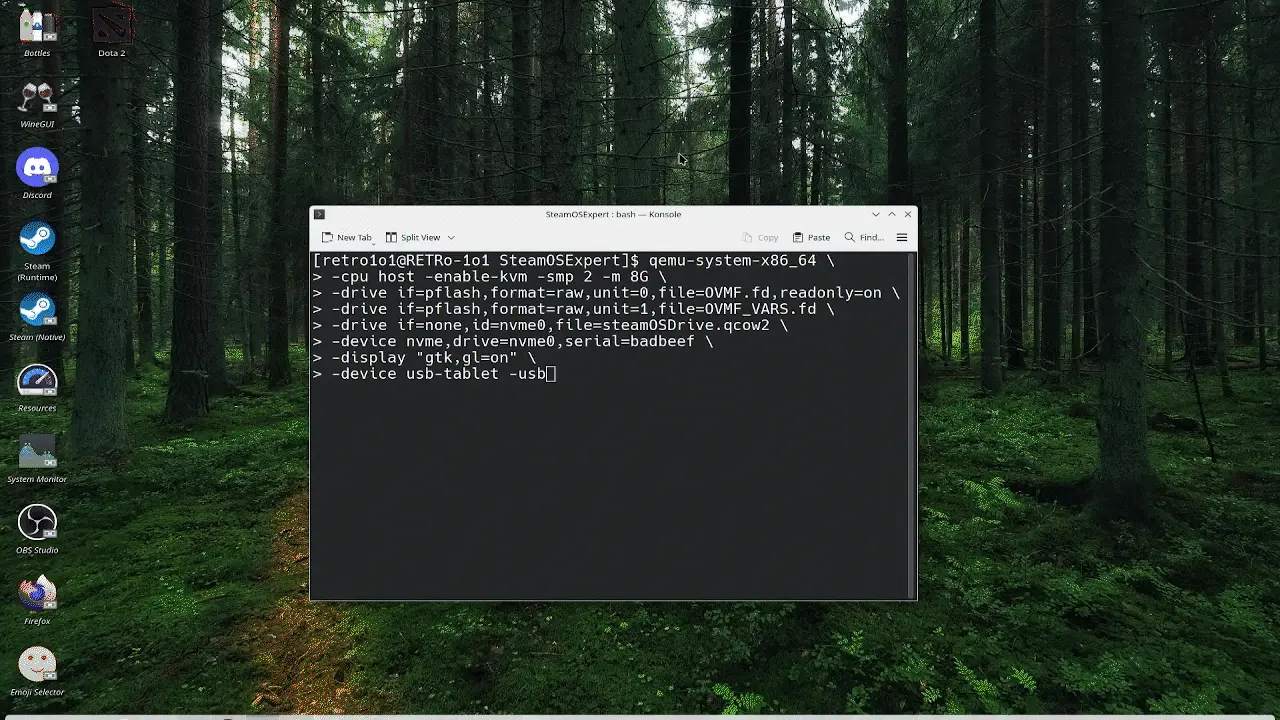
- Now that the installation is complete, we can remove the SteamOS-Recovery.img flag from the QEMU run command since it is no longer needed.
- Run QEMU again with the updated command for booting into SteamOS:
qemu-system-x86_64 \
-cpu host -enable-kvm -smp 2 -m 8G \
-drive if=pflash,format=raw,unit=0,file=OVMF.fd,readonly=on \
-drive if=pflash,format=raw,unit=1,file=OVMF_VARS.fd \
-drive if=none,id=nvme0,file=steamOSDrive.qcow2 \
-device nvme,drive=nvme0,serial=badbeef \
-display "gtk,gl=on" \
-device usb-tablet -usb
Since SteamOS is an Arch-based distribution, it uses pacman as its default package manager. This allows you to install and update packages easily. But first, you need to set a root password for your SteamOS.
After successfully booting into SteamOS for the first time, you'll be greeted with the KDE Plasma desktop. Before you can start installing additional software, you need to set up administrative access.
4.1: Setting the Root Password
- Open a terminal in the virtual machine and run:
passwd - When prompted, enter and re-enter your new root password. With the root password set, you can now download and manage packages.
4.2: Package Signing and Signature Verification
To ensure that every package you install is authentic, you need to establish a secure keyring for pacman.
- To establish a secure keyring, run these commands consecutively:
sudo pacman-key --init sudo pacman-key --populate archlinux sudo pacman-key --populate holo


4.3: Disable SteamOS Read-Only Mode
SteamOS is set to read-only mode by default (to support Gaming Mode). To install or update packages, you need to disable this mode.
- To disable read-only mode, run:
sudo steamos-readonly disable
4.4: Updating SteamOS System Packages
- Finally, we can now update and install system packages with pacman. Run:
sudo pacman -Syu


4.5: Update SteamOS
- The recovery image provides SteamOS version 3.5. To update your system to the latest version, run:
steamos-update


Note: Do the following if you're using SteamOS version (steamdeck-repair-20231127.10-3.5.7.img.bz2):
Expand
New Update (2026)
Important: If you're using the newer SteamOS installer image (steamdeck-repair-20250521.10-3.7.7.img.bz2), you no longer need to manually set KDE Plasma as the default desktop session. In this updated version, KDE remains the default desktop environment (we set during installation) even after running steamos-update.
However, if you're using an older SteamOS installer image (e.g., 2024 version), you will still need to disable Steam's gaming mode and set KDE Plasma as your default desktop session. Otherwise, the system will boot into gaming mode by default, which is not compatible with a VM.
4.6: Applying Updates and Setting the Default Desktop Environment (KDE Plasma)
After updating, the system may revert to Gaming Mode by default. To ensure that KDE Plasma is your default desktop session, you have two methods:
- Partset Other Method
- Partset A/B Method
4.6.1: Partset Other Method
- Open a terminal and run the following commands consecutively:
sudo steamos-chroot --partset other mount -o remount,rw / steamos-readonly disable echo '[Autologin]' > /etc/sddm.conf.d//zz-steamos-autologin.conf echo 'Session=plasma.desktop' >> /etc/sddm.conf.d//zz-steamos-autologin.conf steamos-readonly enable exit reboot

4.6.2: Partset A/B Method
- Open a terminal inside the VM and type these commands consecutively:
cd /dev sudo steamos-chroot --disk nvme0n1 --partset A --no-overlay mount -o remount,rw / steamos-readonly disable echo '[Autologin]' > /etc/sddm.conf.d//zz-steamos-autologin.conf echo 'Session=plasma.desktop' >> /etc/sddm.conf.d//zz-steamos-autologin.conf steamos-readonly enable exit sudo steamos-chroot --disk nvme0n1 --partset B --no-overlay mount -o remount,rw / steamos-readonly disable echo '[Autologin]' > /etc/sddm.conf.d//zz-steamos-autologin.conf echo 'Session=plasma.desktop' >> /etc/sddm.conf.d//zz-steamos-autologin.conf steamos-readonly enable exit reboot


After rebooting, your system should now boot into the latest version of SteamOS with KDE Plasma as the default desktop session.

Frequently Asked Questions: SteamOS Virtualization with QEMU/KVM
What is SteamOS and why would I want to virtualize it?
SteamOS is Valve's Linux-based operating system designed for the Steam Deck and living room gaming. Virtualizing it allows you to test the Steam Deck experience, experiment with its software, and verify game compatibility without owning the physical hardware. It provides a safe sandbox to explore the future of Linux gaming directly from your desktop.
What are the prerequisites for virtualizing SteamOS?
You need:
- A 64-bit Intel or AMD processor with hardware-assisted virtualization (VT-x/AMD-V) enabled in BIOS/UEFI.
- At least 4GB RAM (8GB or more recommended).
- 16GB free disk space for the OS, plus additional space for games and testing (200GB recommended).
- A Linux host with QEMU/KVM properly installed and configured. If you haven't set this up, follow a dedicated QEMU/KVM setup guide.
- OVMF (UEFI firmware) files for QEMU, usually located in /usr/share/ovmf/x64/.
How do I download the SteamOS image?
Download the SteamOS recovery image from the official SteamOS page. The file is provided in BZIP2 format. After downloading, extract it with:
tar -xjf steamOS-recovery-image.bz2
Replace the filename with the actual downloaded file. This will produce a .img file ready for use. Note that version numbers may vary (e.g., 3.5.7 or 3.7.7).
How do I create a virtual hard drive for SteamOS?
Use the qemu-img command to create a virtual disk. For a qcow2 format drive (recommended for its dynamic allocation and features), run:
qemu-img create -f qcow2 steamOSDrive.qcow2 16G
Adjust the size (e.g., 200G) if you plan to install many games. You can also use other formats like raw if preferred.
What are OVMF files and where do I find them?
OVMF (Open Virtual Machine Firmware) provides UEFI support for QEMU virtual machines. SteamOS requires UEFI to boot correctly. You need two files:
- OVMF.fd (or OVMF_CODE.fd): The UEFI firmware code.
- OVMF_VARS.fd: The UEFI variables storage (like CMOS).
They are typically located in /usr/share/ovmf/x64/. If not found, search with:
sudo find / -name OVMF_VARS.fd
What is the QEMU command to install SteamOS?
Run the following command from your SteamOS folder (adjust paths and sizes as needed):
qemu-system-x86_64 \ -cpu host -enable-kvm -smp 2 -m 8G \ -drive if=pflash,format=raw,unit=0,file=OVMF.fd,readonly=on \ -drive if=pflash,format=raw,unit=1,file=OVMF_VARS.fd \ -drive file=SteamOS.img,format=raw \ -drive if=none,id=nvme0,file=steamOSDrive.qcow2 \ -device nvme,drive=nvme0,serial=badbeef \ -display "gtk,gl=on" \ -device usb-tablet -usb
This command attaches the installation image, the target virtual drive, and UEFI firmware. The NVMe device is crucial because SteamOS expects an NVMe drive for installation.
Why does the QEMU command use NVMe instead of SATA?
SteamOS is optimized for the Steam Deck's internal NVMe storage and expects an NVMe device during installation. Using a virtual NVMe drive (-device nvme) ensures compatibility and prevents installation errors. If you use a SATA drive, the installer may fail to detect a suitable target.
How do I install SteamOS from the recovery image?
The installation option depends on your SteamOS version:
- Older versions (3.5.7 and below): Click on Reimage Steam Deck and then Proceed.
- Newer versions (3.7.7 and above): Click on Wipe Devices & Install SteamOS and then Proceed.
The installation process is otherwise identical. After installation, do not reboot immediately; you may need to configure the desktop session (see next question).
How do I bypass SteamOS Gaming Mode after installation?
This depends on your SteamOS version:
- For older versions (3.5.7 and below): You must manually configure KDE Plasma as default. After installation, do not reboot. Open a terminal in the live environment (press Ctrl+Alt+T) and run the following commands:
cd /dev sudo steamos-chroot --disk nvme0n1 --partset A --no-overlay steamos-readonly disable echo '[Autologin]' > /etc/sddm.conf.d/zz-steamos-autologin.conf echo 'Session=plasma.desktop' >> /etc/sddm.conf.d/zz-steamos-autologin.conf steamos-readonly enable exit sudo steamos-chroot --disk nvme0n1 --partset B --no-overlay steamos-readonly disable echo '[Autologin]' > /etc/sddm.conf.d/zz-steamos-autologin.conf echo 'Session=plasma.desktop' >> /etc/sddm.conf.d/zz-steamos-autologin.conf steamos-readonly enable exit reboot
For newer versions (3.7.7 and above): KDE Plasma remains the default desktop even after updates. You do not need to run these commands unless you specifically want to modify the session. However, if you still face issues, the same commands will work.
What is the purpose of the steamos-chroot command?
steamos-chroot is a SteamOS-specific tool that allows you to enter a chroot environment on the installed system's partitions. It handles the complexities of SteamOS's A/B partition scheme and overlay filesystems. This is essential for modifying system files, disabling read-only mode, and changing boot configurations.
How do I set the root password in SteamOS?
After booting into the installed SteamOS (with KDE Plasma), open a terminal and run:
passwd
You will be prompted to enter and confirm a new password for the root user. This password is needed for administrative tasks like installing packages.
How do I initialize pacman keys and verify package signatures?
Since SteamOS is Arch-based, it uses pacman. To ensure package authenticity, run these commands:
sudo pacman-key --init sudo pacman-key --populate archlinux sudo pacman-key --populate holo
This initializes the local keyring and imports the official Arch Linux and Holo (SteamOS) keys, allowing pacman to verify package signatures.
What is SteamOS read-only mode and how do I disable it?
SteamOS uses a read-only root filesystem by default to ensure system integrity and support for atomic updates (especially in Gaming Mode). To install or update packages, you must temporarily disable it:
sudo steamos-readonly disable
After making changes, you can re-enable it with sudo steamos-readonly enable. Disabling read-only mode is necessary for any system modifications.
How do I update SteamOS packages and the system itself?
After disabling read-only mode, update all packages with:
sudo pacman -Syu
To specifically update SteamOS to the latest version (from recovery image to current), run:
steamos-update
The update may take 5-10 minutes. After updating, you must reboot. In newer versions (3.7.7+), KDE Plasma remains default; in older versions, you may need to reapply the desktop session fix.
How do I ensure KDE Plasma stays the default desktop after updates?
This depends on your version:
- Newer versions (3.7.7+): KDE Plasma remains default automatically. No action needed.
- Older versions (3.5.7 and below): Updates can reset the default session. After any update, use one of the steamos-chroot methods (Partset Other or A/B) to reconfigure SDDM. For example:
sudo steamos-chroot --partset other
mount -o remount,rw /
steamos-readonly disable
echo '[Autologin]' > /etc/sddm.conf.d/zz-steamos-autologin.conf
echo 'Session=plasma.desktop' >> /etc/sddm.conf.d/zz-steamos-autologin.conf
steamos-readonly enable
exit
reboot
You may need to do this after every major update if using older versions.
What are the most common mistakes when virtualizing SteamOS?
- Forgetting to enable hardware virtualization (VT-x/AMD-V) in BIOS.
- Not using NVMe drive in QEMU (SteamOS expects NVMe, not SATA).
- Missing OVMF files or not attaching them correctly.
- Using the wrong installer option for your SteamOS version (Reimage vs Wipe Devices).
- Rebooting after installation before disabling Gaming Mode (only for older versions).
- Not initializing pacman keys, causing package installation failures.
- Forgetting to disable read-only mode before installing/updating packages.
- Not reapplying the desktop session fix after system updates (older versions only).
🎉 Congratulations, your SteamOS setup is complete!
You have successfully installed SteamOS on QEMU. You are now ready to explore the Steam Deck ecosystem and test your favorite games in a secure virtual environment.
If this guide helped you, feel free to subscribe for more tutorials. If you encounter any issues, I would be happy to help in the comments.
101 out, I’ll see you in the next one! 🚀